
How to Adjust Magpul MBUS Sights Without Wasting Ammo

Turn the rear knob and front post. The rear dial shifts hits left and right, while the front pin shifts hits up and down. Turning the wrong piece pushes your shots further off target and burns through boxes of ammunition. Once you know which way each part turns, aligning your sights to hit where you aim takes only a few minutes.
Exact steps depend on the version on your rail. Newer styles feature built-in thumb dials on the front sight, but older sets need a small pronged tool or a bullet tip to depress the spring pin. Your adjustments also change depending on whether you are sighting in from scratch or lining up through a glass dot optic. The steps below show you which direction to spin each dial so your next shot lands dead center.
The Rear Sight Sets Windage While The Front Sets Elevation
Before you adjust any sight on your rifle, make the firearm completely safe. Drop the magazine from the magwell, pull the charging handle all the way back, lock the bolt open, and look directly into the chamber. Confirm that no live round rests in the barrel or feeding path. Keep the muzzle pointed in a safe direction downrange throughout the entire adjustment process.
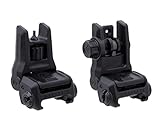
Magpul MBUS backup sights split their adjustments across the two ends of your rifle. Many scope designs keep both dials on a single housing in the middle of the firearm, which leads new shooters to search the rear MBUS sight for an up-and-down control that does not exist. Your rear sight controls windage, which is the left and right movement of your bullet impact. Your front sight controls elevation, which is the up and down movement of your bullet impact on the paper target.
The rear sight features a knurled adjustment knob located on the right-hand side of its polymer or steel housing. Turning this knob slides the rear aiming ring left or right across a threaded horizontal screw. The front sight features a vertical post nestled between two protective curved wings. Screwing that post deeper into the housing or further out of the base changes your vertical impact. Keeping these roles distinct in your mind prevents you from twisting the wrong dial and chasing your bullet holes all over the target.
Your sight radius plays a huge role in how much your point of impact shifts with each click. Sight radius is the exact physical distance between your front sight post and your rear sight aperture. When your MBUS sights sit far apart on a full-length handguard rail, each adjustment click produces a smaller, more precise movement on target. When you mount the sights closer together on a short carbine rail, each click causes a larger shift downrange.
Turn The Rear Knob Clockwise To Push Hits Right
Adjusting your left-to-right impact requires clean shooting form and methodical dial turns. If your shots hit to the left or right of the bullseye, you will make all your corrections exclusively on the rear sight knob. Look at the right side of the rear sight base to find this textured dial. Magpul marks this knob with an arrow pointing toward the letter R to show you which way moves your bullet impact to the right.
Follow these practical steps at the range to dial in your rear sight:
- Set up a stable rest using sandbags or a shooting bench at your target distance, typically 25 yards or 50 yards for backup iron sights.
- Fire a slow, steady three-shot group at your aiming point, focusing on holding the front post crisp and clear in the center of the rear circle.
- Walk downrange to measure how many inches your shot cluster sits to the left or right of your target center.
- Turn the rear windage knob clockwise if your bullet group lands to the left of the center mark.
- Turn the rear windage knob counter-clockwise if your bullet group lands to the right of the center mark.
- Fire another three-shot group to verify the correction, repeating the process until your shots split the vertical center line.
Each click on the rear knob delivers a tactile snap that you can feel through your fingers. On a standard rifle setup with roughly 15 inches of sight radius, each click moves your shot group about 0.4 inches at 50 yards, or roughly 0.8 inches at 100 yards. If your shots land two inches to the left of the bullseye at 50 yards, turning the knob clockwise about five clicks will walk your group straight into the center.
MBUS rear sights also feature a dual-aperture peep system. You have a wide opening for close-range targets or low-light conditions, and a smaller fold-up leaf for precise shooting. Always flip up the small aperture when zeroing your rifle. The smaller hole forces your eye to naturally center the front post every single time, which cuts down human aiming error while you dial in the hardware.
If you turn the knob and feel heavy resistance, stop immediately. The rear sight aperture carriage travels along a limited track. Forcing the dial past its mechanical stop can strip the internal threads or crack the polymer housing. If you run out of clicks and your shots still miss wide, check your handguard rail alignment or confirm that the rear sight clamp sits completely flat in the rail groove.
Adjust Front Posts By Model To Shift Bullet Elevation
Adjusting your up-and-down impact happens entirely at the front sight post. Magpul has produced different versions of the MBUS line, and the method you use to turn the front post depends on which generation sits on your rail. The older MBUS Gen 2 uses an A2-style post, while the MBUS 3 and MBUS Pro lines feature integrated adjustment dials that require no loose tools.
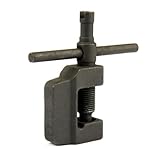
On an MBUS Gen 2 front sight, look down into the protective wings to locate the four-notch post and the spring-loaded detent pin. The detent pin is a small metal plunger that sits in one of the four notches to keep the post from spinning loose under recoil. To turn this post, you must push that metal pin downward while rotating the post. You can do this with a dedicated four-prong sight tool, the tip of a bullet, or a small flat punch.
On an MBUS 3 or an MBUS Pro front sight, the process is tool-free. Magpul built an adjustment wheel directly beneath or around the post. You simply reach between the protective ears with your thumb and index finger, grip the textured edges of the wheel, and rotate it until it snaps into the next notch. The detent pin clicks into place automatically inside the housing.
Follow these steps to raise or lower your bullet group:
- Inspect your target to see if your steady three-shot group sits higher or lower than your aiming point.
- Access the front sight post from above, making sure the rifle safety is engaged and your hands stay clear of the muzzle opening.
- Rotate the post clockwise (screwing the pin downward into the base) if your shots landed lower than your point of aim.
- Rotate the post counter-clockwise (screwing the pin upward out of the base) if your shots landed higher than your point of aim.
- Ensure the spring-loaded detent pin pops fully back up into one of the four post notches before firing your next confirmation group.
On standard AR-15 handguard lengths, one quarter-turn click of the front post moves your bullet impact roughly 1.2 inches at 100 yards, which equals about 0.6 inches at 50 yards or 0.3 inches at 25 yards. If your group hits three inches low at 50 yards, you will need to rotate the post clockwise by roughly five clicks to bring your point of impact up to your aiming point.
Lowering The Front Post Raises Your Shot On Paper
Adjusting a front sight post often confuses shooters because the physical movement feels backwards compared to a scope dial. When you want your bullet to hit higher on the paper, you must screw the front sight post downward into the rifle. When you want your bullet to hit lower on the paper, you must screw the front sight post upward.
This happens because of the way your eye aligns the barrel with the target. Think of your rifle as a long lever pivoting against your shoulder. The rear sight aperture stays at a fixed height above the receiver. When you screw the front sight post downward, making it shorter, you must tilt the entire front end of the rifle upward to center that shorter post inside the rear peep hole. Tilting the barrel upward angles the muzzle toward the sky, which causes the fired bullet to strike higher on the target downrange.
The exact opposite happens when you raise the front post. Screwing the post counter-clockwise makes it taller. When you lift the rifle to aim, your eye sees that tall post sticking out above the center of the rear aperture. To push the tip of the post back down into the middle of your sight picture, you have to tilt the rifle muzzle down toward the ground. That downward barrel angle sends your fired shots lower on the target.
A simple memory trick to use at the shooting bench is to follow your error with the front sight. If your rifle is shooting low, lower the post. If your rifle is shooting high, raise the post. Moving the front post in the exact direction of your miss will always guide the bullet back toward the center of your target.
Be careful not to unscrew the front post too far when correcting low shots. If you rotate an MBUS post counter-clockwise repeatedly without checking thread engagement, the post can unseat from the internal threads and fall out. If you find yourself unscrewing the post until it feels loose in its socket, your handguard may be tilted downward or your barrel nut might not be seated straight against the upper receiver.
Zero Your Iron Sights Before Aligning Your Red Dot
A common mistake among AR-15 owners is trying to zero both their MBUS folding sights and their red dot optic at the exact same moment. Trying to adjust both systems together usually leaves both of them inaccurate. You must establish a reliable zero for each sighting system on its own merits before attempting to use them together.
The relationship between your backup sights and your optic glass is known as co-witnessing. When you look through your red dot optic with your MBUS sights flipped up, you see the iron sights lined up straight through the lower section or exact middle of the optic glass. To explore how different optic heights match up on your rail, take a look at the best iron sights for cowitness with red dot sights for practical mounting guidelines.
Use this sequential checklist to get your iron sights and dot sight working in harmony:
- Turn off your red dot optic or dim the aiming dot completely so the glowing reticle does not pull your focus away from the iron sights.
- Fold the MBUS sights up into their locked vertical positions.
- Fire a group through the optic window, looking only at the front sight post centered inside the rear aperture ring.
- Make all necessary windage and elevation clicks on your MBUS sights until your bullets land directly on your aiming mark.
- Fold your MBUS sights back down into their flat stowed positions against the rail.
- Turn your red dot optic back on and adjust the optic turrets until the glowing aiming dot independently matches your bullet impacts at your chosen zero distance.
- Flip the MBUS sights back up as a final check to confirm that the zeroed red dot sits directly on top of, or right next to, your zeroed front sight post.
Never spin the dials on your MBUS sights just to make the front post cover the red dot while sitting at home on your couch. An optic dot can appear centered in the glass even when the optic is completely misaligned with the barrel bore. If you force your iron sights to align with an unverified red dot, you ruin the accuracy of your backup sighting system. Only live-fire testing on paper guarantees that both systems point exactly where your rifle shoots.
A Dedicated Adjustment Tool Protects Your Front Sight Post
Adjusting the front elevation post on newer MBUS models is easy because the built-in thumb wheels turn smoothly by hand. Older MBUS Gen 2 setups, however, present a unique challenge at the shooting bench. The polymer wings leave very little clearance for thick fingers, and the internal spring holding the detent pin can be stiff from the factory. Trying to force a tight post with an improvised tool often leads to frustration and damaged parts.
Many shooters try using a loose bullet tip, a flathead screwdriver, or a knife blade to depress the front detent pin. A sharp steel screwdriver or knife can slip off the post and gouge the surrounding polymer wings, permanently disfiguring your sight. A cartridge tip can bend or crease under heavy spring pressure, leaving metal shavings down inside the detent channel that bind up the mechanism.
A purpose-built front sight adjustment tool solves this problem completely. This type of tool uses a hollow cylindrical barrel with four precision-cut steel prongs protruding from the bottom rim. You slide the cylinder down over the post, and the steel prongs depress the spring-loaded detent pin evenly while grabbing the four notches on the post. Once seated, you simply twist the knurled handle to spin the post smoothly without touching or scratching the surrounding housing.
When shopping for an adjustment tool, check that it features solid metal construction rather than soft plastic. Steel or durable aluminum tools provide the leverage needed to turn stubborn posts without flexing or rounding off at the tips. Confirm that the tool specifies four-prong compatibility to match standard A2 and MBUS post patterns. Having a dedicated tool tucked into your range bag or rifle grip compartment ensures you can dial in your elevation in seconds without marking up your rifle.

- ARS Mark9.8
ARS Mark is a ranking system developed by bestairriflescopes.com. ARS Mark has no relationship or impact from any manufacturers or sales agent websites. Learn more
- BrandMagpul

- ARS Mark9.6
ARS Mark is a ranking system developed by bestairriflescopes.com. ARS Mark has no relationship or impact from any manufacturers or sales agent websites. Learn more
- BrandMagpul

- ARS Mark9.6
ARS Mark is a ranking system developed by bestairriflescopes.com. ARS Mark has no relationship or impact from any manufacturers or sales agent websites. Learn more
- BrandEastern Tactical Supply

- ARS Mark9.4
ARS Mark is a ranking system developed by bestairriflescopes.com. ARS Mark has no relationship or impact from any manufacturers or sales agent websites. Learn more
- BrandGeneric
- ARS Mark9.2
ARS Mark is a ranking system developed by bestairriflescopes.com. ARS Mark has no relationship or impact from any manufacturers or sales agent websites. Learn more
- BrandMagpul
- ARS Mark8.4
ARS Mark is a ranking system developed by bestairriflescopes.com. ARS Mark has no relationship or impact from any manufacturers or sales agent websites. Learn more
- BrandTACFUN

- ARS Mark8.2
ARS Mark is a ranking system developed by bestairriflescopes.com. ARS Mark has no relationship or impact from any manufacturers or sales agent websites. Learn more
- BrandBlitzkrieg Components, LLC

- ARS Mark7.8
ARS Mark is a ranking system developed by bestairriflescopes.com. ARS Mark has no relationship or impact from any manufacturers or sales agent websites. Learn more
- BrandGeneric
Last update on 2026-09-30 / Affiliate links / Images, Product Titles, and Product Highlights from Amazon Product Advertising API


12 Best 22 Pcp Air Rifle For Hunting of 2026 With Quiet Power

7 Best 22 Pcp Air Rifle Under 300 of 2026 For Backyard Pest Control

10 Best 22 Break Barrel Air Rifles of 2026 For Backyard Pest Control

10 Best 30 Caliber Pcp Air Rifle of 2026 For Medium Game

Top Best 177 Air Rifle Under 100: Budget-Friendly Picks for 2026

How to Safely Reload Shotgun Shells at Home

11 Best Co2 Air Rifle For Pest Control of 2026 To Ensure Humane Dispatch

12 Best Inexpensive Air Rifles of 2026 For Dependable Backyard Accuracy






