
How to Bore Sight an AR-15 to Hit Paper on Your First Shot

A fresh optic sits clamped to the rifle rail, but firing blind at the range often burns through expensive ammunition just trying to find the paper. The easiest fix is to align your sight to the barrel at home before packing your range bag. Looking straight down the empty barrel at a distant spot, or slipping a small laser cartridge into the chamber, lets you dial the reticle onto that same target in minutes.
Your setup depends on the space you have and whether you prefer free visual checks or a laser tool. Peeking through the open bore costs nothing, while a laser keeps the rifle assembled. Since an AR-15 sight sits noticeably higher than the barrel, accounting for that height gap across an indoor room keeps your aim true. Here is how to line everything up so your first live shot lands cleanly on paper.
Visual Alignment Versus Chamber Laser Tools
Bore sighting means pre-aligning the barrel and sight before firing a single live round. When you mount a new red dot or scope on your AR-15, the glass reticle and the steel barrel point in two completely different directions. If you head straight to the shooting range without aligning them first, your first shots will likely miss the entire cardboard target backer. Searching for stray bullet holes on a cold firing line wastes time, burns expensive ammunition, and causes unnecessary frustration. Bore sighting solves this problem at your home workbench in less than fifteen minutes.
You can pre-align your rifle using two reliable methods: free visual alignment or a chamber-inserted laser tool. The visual method costs zero dollars and requires no extra equipment. You simply open the rifle body, slide out the internal mechanism, and look straight down the open bore at a fixed target across the room. Because you are looking directly through the rifled steel pipe, this method never fails. A straight tube never runs out of battery power or suffers from misaligned internal diodes.
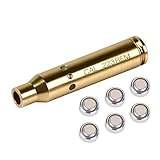
A caliber-specific laser cartridge offers a faster, more convenient alternative. These brass or aluminum devices are shaped exactly like a standard .223 Remington or 5.56mm cartridge. You slip the laser into the chamber, close the action gently, and follow the bright dot projected onto a distant wall. Laser tools let you align your optic without taking the rifle apart, which makes them handy if you want to verify your zero in a dim basement, garage, or backyard before heading out to shoot.
Neither method replaces true zeroing with live ammunition. Bullets travel in a curved arc governed by gravity, barrel twist, and air resistance, while your eyes and laser beams travel in perfectly straight lines. Bore sighting merely ensures your rifle is on paper at 25 or 50 yards so your first live shots land safely where you can see and measure them.
How to Visually Bore Sight an AR-15 Without Extra Gear
Visual bore sighting is the most reliable way to pre-align an AR-15 at home. Before touching any pins or dials, safety comes first. Drop the magazine, pull the charging handle fully back, and lock the bolt open. Visually inspect the chamber and stick a finger inside to confirm no live cartridge is present. Remove all live ammunition from your workspace completely.
- Secure the rifle in a stable rest. Clamp the rifle into a padded workbench vise, place it across sturdy front and rear sandbags, or set it into a cleaning stand. The rifle must sit rock-still so it does not wiggle or tip when you take your hands off the furniture.
- Open the rifle body. Locate the rear takedown pin (a small push-pin that opens the rifle body) on the lower receiver just above the pistol grip. Push the pin firmly from left to right until it clicks out. Pivot the upper receiver upward away from the lower receiver. If your workspace is tight, push the front pivot pin out as well and set the entire lower half aside.
- Remove the bolt assembly. Pull the charging handle back about halfway. Slide out the bolt carrier group (the internal sliding bolt mechanism) and lift the charging handle out of its track. Set both parts on a clean towel. You now have an unobstructed view straight through the barrel from the chamber out to the muzzle.
- Set up a high-contrast target. Pick a spot across the room, down an interior hallway, or out an open window. A distance of 15 to 25 yards works best. Tape a sheet of white paper with a bold two-inch black circle or bullseye to the wall at roughly the same height as your rifle barrel.
- Center the target in the bore. Sit behind the upper receiver and position your eye roughly six to nine inches back from the open chamber. Look directly down the center of the barrel. Nudge your bench rest or sandbags until the distant black circle sits perfectly centered inside the round circle of the barrel bore. You should see a clean, even ring of light around the target. Once centered, do not bump the rifle.
- Adjust your optic to match the bore. Without touching or leaning on the rifle, raise your head to look through your optic glass. Use the windage and elevation dials (the left-to-right and up-and-down adjustment click dials) to move your aiming dot or crosshairs. Turn the dials until the reticle rests directly over the center of the black circle you just aligned through the barrel.
- Verify and reassemble. Lower your eye back to the bore to confirm the target has not drifted out of center. Glance back through the optic to confirm the aiming dot sits on the same spot. Once both align, slide the charging handle and internal sliding bolt mechanism back into the upper receiver, close the rifle, and push the takedown pins back in.
Using a Laser Cartridge and Compensating for Sight Height
Using a chamber laser cartridge saves time and keeps your rifle fully assembled. Clear the rifle completely and verify the chamber is empty before starting. Unscrew the battery cap of your laser cartridge, insert the small button batteries, and screw the cap tight until the beam turns on. Slip the laser cartridge into the chamber by hand, then ride the charging handle forward slowly until the bolt closes. Never let the bolt slam shut under full buffer spring force. Dropping the bolt at full speed can crush the laser casing or knock the internal diode out of alignment.
Rest your rifle on solid sandbags and aim the beam at a target backer 15 to 25 yards away. Remove the protective dust caps from your optic. Turn the left-to-right and up-and-down adjustment click dials until your optic reticle meets your laser dot on the wall. When you finish, pull the charging handle back, lock the bolt open, and tip the rifle back to catch the laser cartridge as it slides out. If the cartridge sticks in the chamber, slide a soft wooden dowel or clean brass cleaning rod down the muzzle to tap it loose gently.
When aligning an AR-15 indoors, you must account for sight height. Unlike traditional hunting rifles where the scope sits close to the barrel, the AR-15 uses an inline stock design. This straight stock forces manufacturers to mount optics high on standard Picatinny or 20mm slotted accessory rails so you can see through them comfortably. The vertical space from the barrel center to the optic lens center is called height over bore, and it typically measures between 2.5 and 2.8 inches on flat-top AR-15 rifles.
This height difference creates a common indoor trap. Light travels in a straight line. If you align your red dot to sit directly on top of your laser dot at a short indoor distance like 10 yards, your optic and barrel will converge at a sharp downward angle. When you take that rifle to the outdoor range at 50 or 100 yards, your bullets will impact several inches higher than where the dot points. To avoid this error indoors, adjust your aiming dot so it rests roughly 1.5 inches directly above the laser dot or visual bore mark at 15 yards. Keeping that small vertical gap ensures your barrel and sight line remain parallel until the bullet begins its natural trajectory downrange.
If you run backup iron sights on your rifle alongside a red dot, lining up your backup iron sights through the optic glass gives you an instant second check. If your iron sights are already dialed in, centering your red dot on top of the front sight post confirms your optical alignment before you leave the house.
Before packing your gear for the range, follow this quick verification checklist to ensure your live-fire zero goes smoothly:
- Mount security check: Confirm your optic base and ring screws are tightened with an inch-pound torque tool and secured with thread-locking fluid so weapon recoil does not shake the optic loose.
- Initial target distance: Set your first live-fire paper target at 25 yards using a large cardboard backer to catch early rounds.
- Three-shot confirmation: Fire a steady three-shot group from a supported bench rest without touching your adjustment dials.
- Measure the group center: Measure the vertical and horizontal distance from the center of your three-shot group to the bullseye.
- Final dial adjustments: Use your optic click dials to walk the group to the bullseye at 25 yards, then move to your preferred zero distance (such as 50 or 100 yards) for final adjustments.
What to Look for in an AR-15 Laser Alignment Tool
Choosing the right alignment tool depends on your workspace, lighting conditions, and how often you swap optics. Cartridge-style units machined specifically for .223 Remington and 5.56mm chambers provide the most consistent results for AR-15 platforms. Because they mimic the exact dimensions of standard ammunition, they sit squarely against the chamber shoulder. This design keeps the beam centered along the bore axis without touching the rifling or risking damage to the delicate crown at the tip of your muzzle.
Battery longevity and power controls deserve close attention. Most cartridge sighters run on tiny button-cell batteries that offer limited continuous runtime. Choosing a model that includes multiple battery sets ensures you do not run out of power halfway through adjusting your optic dials. Units built with an integrated push-button switch or an end-cap switch make setup much easier because you can toggle the laser off while turning optic clicks without unchambering the device each time.
Laser diode color also changes where you can work. Standard red lasers are affordable and perform exceptionally well across indoor spaces, basements, and shaded garages. Bright green lasers produce a beam that is vastly easier for human eyes to detect in daylight. If you plan to verify your alignment outdoors at an open firing line or in bright sunlight, a green laser gives you the contrast needed to spot your reference dot against paper targets at extended distances.

- ARS Mark9.0
ARS Mark is a ranking system developed by bestairriflescopes.com. ARS Mark has no relationship or impact from any manufacturers or sales agent websites. Learn more
- BrandCVLIFE

- ARS Mark9.0
ARS Mark is a ranking system developed by bestairriflescopes.com. ARS Mark has no relationship or impact from any manufacturers or sales agent websites. Learn more
- Brandmoloxo

- ARS Mark9.0
ARS Mark is a ranking system developed by bestairriflescopes.com. ARS Mark has no relationship or impact from any manufacturers or sales agent websites. Learn more
- BrandDespwolf

- ARS Mark8.8
ARS Mark is a ranking system developed by bestairriflescopes.com. ARS Mark has no relationship or impact from any manufacturers or sales agent websites. Learn more
- BrandEZshoot
- ARS Mark8.8
ARS Mark is a ranking system developed by bestairriflescopes.com. ARS Mark has no relationship or impact from any manufacturers or sales agent websites. Learn more
- BrandMidTen

- ARS Mark8.8
ARS Mark is a ranking system developed by bestairriflescopes.com. ARS Mark has no relationship or impact from any manufacturers or sales agent websites. Learn more
- BrandCVLIFE
- ARS Mark8.8
ARS Mark is a ranking system developed by bestairriflescopes.com. ARS Mark has no relationship or impact from any manufacturers or sales agent websites. Learn more
- BrandCVLIFE

- ARS Mark8.8
ARS Mark is a ranking system developed by bestairriflescopes.com. ARS Mark has no relationship or impact from any manufacturers or sales agent websites. Learn more
- BrandEZshoot

- ARS Mark8.4
ARS Mark is a ranking system developed by bestairriflescopes.com. ARS Mark has no relationship or impact from any manufacturers or sales agent websites. Learn more
- BrandFeyachi
Last update on 2026-10-01 / Affiliate links / Images, Product Titles, and Product Highlights from Amazon Product Advertising API
FAQs
Can bore sighting replace zeroing at the firing range?
No, bore sighting never replaces live-fire zeroing. Bore sighting only aligns the mechanical axis of the barrel with the sight reticle so your initial rounds hit a standard paper target. It cannot account for bullet weight, powder charge velocity, wind drift, or gravitational bullet drop. You must fire live rounds at the range to set your true working zero.
At what distance should I set my target when bore sighting indoors?
A distance of 15 to 25 yards is ideal for indoor bore sighting. This distance provides a clear sight picture through the barrel while keeping laser dots sharp and easy to spot. If your indoor space limits you to 10 yards, remember to position your aiming reticle about 1.5 inches above the bore center to compensate for the rifle's sight height.
Why do my shots land low at close range after bore sighting?
Your shots land low at close range because an AR-15 optic sits roughly 2.5 to 2.8 inches above the center of the barrel. At close distances under 15 yards, the bullet has not yet risen to meet your line of sight. When taking close shots on targets inside 10 yards, you must deliberately aim a couple of inches high to compensate for this physical offset.


12 Best 22 Pcp Air Rifle For Hunting of 2026 With Quiet Power

7 Best 22 Pcp Air Rifle Under 300 of 2026 For Backyard Pest Control

10 Best 22 Break Barrel Air Rifles of 2026 For Backyard Pest Control

10 Best 30 Caliber Pcp Air Rifle of 2026 For Medium Game

Top Best 177 Air Rifle Under 100: Budget-Friendly Picks for 2026

How to Safely Reload Shotgun Shells at Home

11 Best Co2 Air Rifle For Pest Control of 2026 To Ensure Humane Dispatch

12 Best Inexpensive Air Rifles of 2026 For Dependable Backyard Accuracy






