How to Change Glock Sights Without Damaging Your Slide

Unload the pistol completely, separate the slide from the frame, and take out the barrel. Stripping the slide gives direct access to the factory parts and keeps the workspace safe. From there, the job takes two main moves: unscrewing the front sight with a thin hex tool from inside the slide and pressing the rear sight sideways out of its slot. Installing the new set happens in reverse, secured with a drop of liquid thread glue so the front post never rattles loose.
The exact approach depends on your tools and sight style. Glowing night sights hold fragile glass vials that can break under hammer strikes, making a screw-driven pusher tool much safer than a punch. Some replacement rear sights also fit snugly, requiring a quick check and light filing along the base so the metal glides into the slide without sticking. The guide below walks through both parts step by step.
What tools do you need before starting?
Unload your pistol completely before picking up a tool. Press the magazine release, remove the magazine, and put it in another room. Pull the slide back several times, lock it open, and look into the chamber. Feel the empty chamber with your finger to confirm no round is present. Once clear, lower the slide lock levers and pull the slide assembly forward off the frame. Remove the recoil spring and barrel so you have a bare slide.
Swapping your sights requires a few basic items to avoid damaging the metal finish:
- Front sight tool: A 3/16-inch thin-wall hex nut driver. Standard hardware sockets are too thick to fit inside the tight slide cavity.
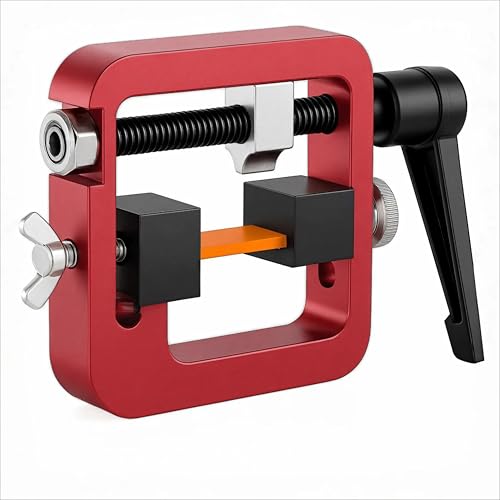
- Sight pusher tool: A clamp tool that turns a screw to press sights sideways through the dovetail (the angled mounting slot cut into the slide). This replaces rough hammer strikes with smooth mechanical force.
- Blue threadlocker: Liquid screw glue that prevents screws from loosening during recoil. Always pick medium-strength blue formula, never permanent red.
- Rubbing alcohol: Cleans factory oils off screw threads so the liquid screw glue bonds firmly.
- Padded vise or soft cloth: Protects the slide finish from scuffs while you apply clamping pressure.
- Fine metal file: Useful if the new rear sight base fits too tightly in the slide slot.
- Measuring calipers: A simple dial or digital caliper measures both sides of the rear sight to confirm it is centered.
How do you replace the front sight cleanly?
The front sight connects to the slide through a single small hex screw inside the front cavity. Because space is limited, take your time with each step so you do not round off the tiny screw head.
- Seat the hex tool completely: Lay the slide upside down on your bench. Insert your 3/16-inch thin-wall driver into the recess until it sits square on the screw head. If the socket is tilted or half-seated, it can strip the tiny corners.
- Loosen the factory screw: Hold the slide flat and turn the driver counter-clockwise. Factory threadlocker may release with a sharp pop. Lift the screw out and take the old sight off the top of the slide.
- Degrease the threads: Use a cotton swab dipped in rubbing alcohol to wipe the slide opening and the threads of your new screw. Removing factory grease ensures the threadlocker bonds properly. Let it dry for two minutes.
- Position the new front sight: Push the base post of the new sight into the hole on top of the slide. Make sure the aiming dot or post faces back toward you and sits parallel with the sides of the slide.
- Apply threadlocker: Put one small drop of medium-strength blue threadlocker on the threads of the new screw. Avoid excess glue, which can drip past the threads into the internal slide channels.
- Thread the screw by hand: Place the screw on the driver tip, insert it into the cavity, and turn it clockwise gently. If you feel resistance right away, stop and restart so you do not cross-thread the fine metal.
- Snug it lightly: Turn until the screw stops against the slide wall, then add a light fraction of a turn to snug it down. Do not use full arm force, or the screw will snap.
Which way do you push the rear sight out?
Glock rear dovetail slots have straight parallel sides rather than a tapered wedge. Standard armorer practice is to remove the factory sight from left to right, looking from behind the slide as if you were aiming downrange.
- Protect the slide: Wrap painter tape or thick paper around the sides of your slide. This padding prevents bare metal clamping jaws from scuffing your slide finish.
- Clamp the slide level: Set the slide inside the sight pusher base. Tighten the support pads until the slide is firm and completely level. If the slide sits crooked, the pusher block will push downward into the metal rather than sliding the sight sideways.
- Position the pusher block: Lower the pusher block so it makes full contact with the wide base of the rear sight, right near the dovetail slot. Avoid placing the block high on the sight blade, which can bend the metal or crack internal tritium glass vials.
- Drive the sight out: Slowly rotate the main screw handle on your pusher tool clockwise. Turn smoothly until the old sight slides free of the right edge of the slide and drops out.
- Wipe the slot: Clean the empty dovetail slot with a dry rag. Remove any dirt or metal dust before trying to install your new sight.
How do you install and center the rear sight?
Aftermarket sights often feature slightly oversized bases to ensure a tight lock across different production batches. Taking time to check the fit avoids damaging your slide.
- Check the sight fit by hand: Slide the base of the new sight into the right side of the dovetail slot using only your fingers. A properly sized sight should slide roughly one-third or halfway across the slot without needing tools.
- File the base if necessary: If the sight stops at the edge and will not enter by hand, do not force it. Place a fine metal file flat on your table. Run the flat bottom of the sight base across the file two or three times with light, even pressure. Wipe away the dust and check the fit by hand again. Never file the slide dovetail; only remove material from the bottom of the sight.
- Clamp the slide into the pusher: Once the sight enters halfway by hand, secure your slide back into the pusher tool with protective padding.
- Press the sight into place: Turn the pusher bolt slowly to drive the sight from right to left toward the center. If the tool suddenly locks up, back off and check that the sight is not wedging at an angle.
- Verify the center alignment: Use calipers or a fine ruler to measure from the left slide edge to the left side of the sight base, then check the right side. Adjust the pusher handle until both sides match. If you are fitting taller iron sights to back up an optic glass, take a look at the best iron sights for cowitness with red dot sights to make sure your sight height matches your setup.
What mistakes ruin slides and sights during installation?
Swapping sights at home is safe when you take your time, but rushing through the process can lead to costly mistakes:
Hammering sights with steel punches: Driving sights with a steel punch easily slips off the target, gouging the slide surface. Hard hammer blows also send shock waves into the sight body. If your new sights contain tritium gas vials for low-light aiming, hammer impacts can shatter the tiny glass tubes and ruin the glow permanently.
Over-torquing the front screw: The 3/16-inch front screw has a thin, delicate shank. Applying full hand torque snaps the head off, leaving the threaded body stuck inside the sight base. Snug the screw with gentle finger pressure only.
Skipping liquid screw glue: Handgun slide recoil produces harsh vibrations on every shot. Without medium-strength blue threadlocker on the front screw threads, the sight will rattle loose after fifty to one hundred rounds and can fall off entirely at the range.
Pushing high on the rear sight blade: Placing your pusher tool against the top notch of the sight creates excessive leverage. This can twist the sight base in the slot, burring the slide groove or snapping the sight body.
Forcing an oversized sight without filing: Cranking hard on a mechanical pusher when a sight base is too thick causes metal galling. This strips finish and metal out of your slide dovetail, leaving future sights loose in the slot.
What tools make this job safer and easier?
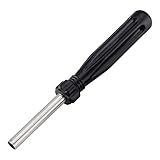
Having the right dedicated tools turns sight installation into a smooth, simple job. For the front sight, look for a 3/16-inch hex driver designed specifically for handguns. Verify that it has an extra-thin socket wall so it drops cleanly into the slide cavity without binding against the steel walls. A magnetized tip is another helpful feature, keeping the small screw attached to the tool while you align the threads.
For the rear sight, pick a heavy-duty mechanical sight pusher tool rather than relying on hammer strikes. Choose a model with solid aluminum or steel construction that locks the slide securely on all sides. Make sure the pusher block provides reversible contact faces, including straight ninety-degree profiles for standard sights and angled thirty-degree cuts for sloped designs. Sturdy clamping plates and smooth drive threads give you full control, letting you center your rear sight without slipping or scratching the finish.

- ARS Mark9.8
ARS Mark is a ranking system developed by bestairriflescopes.com. ARS Mark has no relationship or impact from any manufacturers or sales agent websites. Learn more
- BrandGsodoolu

- ARS Mark9.6
ARS Mark is a ranking system developed by bestairriflescopes.com. ARS Mark has no relationship or impact from any manufacturers or sales agent websites. Learn more
- BrandTRUGLO

- ARS Mark9.4
ARS Mark is a ranking system developed by bestairriflescopes.com. ARS Mark has no relationship or impact from any manufacturers or sales agent websites. Learn more
- BrandLUSOFAE
- ARS Mark9.2
ARS Mark is a ranking system developed by bestairriflescopes.com. ARS Mark has no relationship or impact from any manufacturers or sales agent websites. Learn more
- BrandRaiseek

- ARS Mark9.2
ARS Mark is a ranking system developed by bestairriflescopes.com. ARS Mark has no relationship or impact from any manufacturers or sales agent websites. Learn more
- BrandLtnsimy

- ARS Mark9.2
ARS Mark is a ranking system developed by bestairriflescopes.com. ARS Mark has no relationship or impact from any manufacturers or sales agent websites. Learn more
- BrandUrgeeo

- ARS Mark9.2
ARS Mark is a ranking system developed by bestairriflescopes.com. ARS Mark has no relationship or impact from any manufacturers or sales agent websites. Learn more
- BrandLUSOFAE
- ARS Mark5.2
ARS Mark is a ranking system developed by bestairriflescopes.com. ARS Mark has no relationship or impact from any manufacturers or sales agent websites. Learn more
- BrandTuòZ
Last update on 2026-10-02 / Affiliate links / Images, Product Titles, and Product Highlights from Amazon Product Advertising API
FAQs
Can you change Glock sights with a hammer and punch?
You can remove standard factory sights using a brass or nylon punch while holding the slide in a padded vise. Never use a steel punch, which will scratch the slide finish if it slips. If you are installing night sights, avoid hammer strikes completely because the shock can shatter the delicate internal glass vials.
Should you use red or blue threadlocker on sight screws?
Always use medium-strength blue threadlocker on front sight screws. Blue threadlocker cures firmly enough to resist recoil vibrations while still allowing removal with hand tools. Red threadlocker is permanent and requires direct flame or intense heat to loosen, which can burn slide coatings and ruin sights.
How do you confirm the new sights are properly zeroed?
Centering the rear sight with calipers gets your alignment close, but you must confirm it with live fire at a range. Fire a group of five rounds from a steady bench rest at fifteen yards. If the group lands consistently to one side, use your sight pusher to nudge the rear sight slightly in the direction you want the bullet impact to move.
When should you take your slide to a gunsmith?
Take the slide to a gunsmith if you snap a front screw shank inside the sight base, since removing broken threads requires specialized drill fixtures. You should also seek professional help if an aftermarket rear sight binds firmly in the slot and you are uncomfortable using a hand file to adjust the base fit.


12 Best 22 Pcp Air Rifle For Hunting of 2026 With Quiet Power

7 Best 22 Pcp Air Rifle Under 300 of 2026 For Backyard Pest Control

10 Best 22 Break Barrel Air Rifles of 2026 For Backyard Pest Control
10 Best 30 Caliber Pcp Air Rifle of 2026 For Medium Game
Top Best 177 Air Rifle Under 100: Budget-Friendly Picks for 2026

How to Safely Reload Shotgun Shells at Home

11 Best Co2 Air Rifle For Pest Control of 2026 To Ensure Humane Dispatch

12 Best Inexpensive Air Rifles of 2026 For Dependable Backyard Accuracy