
How to Install a Red Dot on a Pistol So It Stays Tight

A shooter sits at the workbench with an unloaded pistol slide, a brand-new optic, and a small bag of tiny screws spread across a mat. Getting that glass securely anchored comes down to applying blue threadlocker (liquid screw glue) and tightening each screw to the proper torque (measured turning force) with a specialized driver. Doing this correctly keeps the sight firmly attached through heavy recoil, without stripping the soft metal threads or letting the unit shake loose.
The exact process depends on how the pistol slide is built. Some handguns have a direct factory cutout, while others use a modular adapter plate or mount into the rear sight notch. Screw length is just as critical, because a screw that reaches even a hair too deep can bind internal parts like the extractor rod and jam the gun. Taking a quick moment to verify fit and clearance makes the whole setup safe and reliable.
Clear the Pistol and Match Your Slide Mounting Style
Before you pick up a screwdriver or touch an optic, make your handgun completely inert. Drop the magazine out of the grip and set it aside. Pull the slide back several times, lock it open, and look directly into the chamber to make sure no round is present. Stick your finger into the chamber and the magazine well to physically confirm the gun is empty. Remove all live ammunition from your workbench and put it in another room before you proceed.
Now take a close look at the top of your pistol slide. Handguns accept red dot sights in one of three ways, and knowing your slide design determines how you mount the optic:
- Direct-milled factory slide: The top of the slide has a factory pocket cut directly into the metal. The optic sits straight down into this pocket and screws directly into the slide steel. This creates the lowest, sturdiest mounting position.
- Modular adapter plate system: The slide has a wide, shallow cutout, but it does not match a single sight footprint directly. Instead, you secure a flat steel or aluminum adapter plate to the slide first, and then screw the red dot onto that plate.
- Rear sight dovetail adapter: If your pistol does not have a factory optic cut, you can remove the rear iron sight from its notch (called the dovetail). A small metal mounting base presses into that empty dovetail notch, giving you a flat base with screw posts above the slide.
Every red dot uses a specific footprint, which is simply the pattern of screw holes and raised alignment pins (called recoil lugs) on its base. Common patterns include the larger RMR pattern and the smaller RMSc pattern found on compact carry pistols. The small raised lugs on your slide or adapter plate must slip smoothly into the corresponding sockets under the sight. These lugs absorb the violent forward-and-backward force of the slide cycling so your tiny mounting screws do not take the full impact of recoil.
Dry-Fit the Optic and Confirm Proper Screw Length
Never apply glue or tighten hardware down until you dry-fit every single component. Dry-fitting means assembling the parts completely bare so you can spot alignment errors or screw clearance problems before they ruin your pistol.
Follow this checklist to verify your fit before doing any permanent work:
- Drop the optic onto the slide or plate: Set the optic straight down over the recoil lugs. It should settle flat against the metal with zero rocking, wobbling, or daylight visible beneath the housing. If the sight rocks back and forth like an uneven chair, the recoil lugs are too tall or the footprint does not match.
- Inspect the screw head shape: Look at the screws that came with your sight. Most pistol optics require flat, cone-shaped screws (countersunk screws) that sit flush inside the optic housing holes. If you use rounded button-head screws in a cone-shaped pocket, the screw will not seat squarely and will loosen under vibration.
- Count thread engagement by hand: Drop the screws through the sight holes and turn them into the slide using only your fingers or a loose driver bit. Count how many full 360-degree turns you get before the screw snugs down. You need at least 3 to 5 full turns of thread engagement. Fewer than 3 turns means the screw is too short and will rip out under recoil; more than 6 turns can mean the screw is too long and risks bottoming out.
- Check for bottoming out: A screw bottoms out when its tip hits the bottom of a blind hole before the screw head clamps the optic down. If you tighten a bottomed-out screw, your torque tool will tell you it is tight, but the sight will still wobble loose in your hands.
- Inspect the right-side screw clearance: On many popular striker-fired handguns, the right-side screw hole sits directly above the internal channel holding the extractor depressor plunger (the spring-loaded rod that pushes the casing claw). If the right screw is even one thread too long, it pokes into that channel, binds the rod, and stops your pistol from extracting empty shell casings.
If you suspect the right screw is too long, take the slide off the frame and look into the extractor channel from the back. If you see the tip of the screw protruding into the round tunnel, remove the screw and shorten it slightly with a fine metal file, or swap it for a shorter screw from your kit.
Degrease the Threads and Apply the Right Screw Glue
Screws loosen under recoil because gun oil and manufacturing lubricants act like grease on the threads. Even tiny traces of factory preservative will prevent thread-locking fluid from bonding to the steel. Cleaning the metal surfaces is the most critical preparation step for a tight, permanent mount.
- Degrease the screw threads: Dip a cotton swab or a clean paper towel in 91 percent isopropyl alcohol or a dedicated quick-drying solvent. Scrub the threads of every mounting screw until all oil, grit, and manufacturing residue are gone. Set the screws on a clean, dry paper towel.
- Clean out the slide holes: Wet a fresh cotton swab with your solvent, squeeze out the dripping excess, and twist it down into the threaded holes in your slide or adapter plate. Repeat this with dry cotton swabs until they come out clean and white. Allow two full minutes for the alcohol to completely evaporate so no wet fluid remains inside the holes.
- Select medium-strength blue threadlocker: Use a removable medium-strength liquid screw glue, commonly sold as blue threadlocker. Never use red threadlocker on pistol optic screws. Red formula requires a torch heated to over 400 degrees Fahrenheit to release, which will melt your optic lens coatings and fry its electronic emitter. Blue formula holds securely against violent recoil vibrations but can still be removed later using ordinary hand tools.
- Apply one small drop: Place one tiny droplet of blue threadlocker onto the lower third of each screw's threads. You do not need to soak the screw. A single drop spreads across the threads as you turn the screw into the slide. Never pour liquid glue directly into the slide holes, because excess fluid will run down past the threads into your firing pin or extractor channels.
Tighten the Screws With an Inch-Pound Torque Tool
Never guess screw tightness by feel using a standard L-shaped Allen key. Tiny optic screws have delicate drive sockets that strip out easily when over-tightened. Conversely, under-tightened screws back out under recoil and send the optic flying back toward your face. Always use a proper inch-pound torque driver (a specialized hand wrench that slips or clicks when you reach an exact twisting force).
- Look up the exact torque value: Check the user manual for your optic, adapter plate, and pistol slide. Most manufacturers specify between 12 and 15 inch-pounds (in-lb) of torque for optic mounting screws. Adapter plates mounted to the slide often require 10 to 12 inch-pounds, while the sight secured to the plate may call for 12 to 15 inch-pounds. Remember that these are inch-pounds, not foot-pounds; applying foot-pounds will instantly snap the screw head off inside your slide.
- Select the correct driver bit: Inspect the screw head to determine if it takes a hex bit or a star-shaped Torx bit (most commonly T10 or T15). Insert the bit into the screw socket by hand and wiggle it. The bit must seat fully and deeply with zero play. If the bit wobbles or sits shallow, do not turn it, or you will strip the soft screw head.
- Start each screw gently by hand: Turn the screws into the threaded holes using only the driver bit held between your fingertips. This ensures the screw catches the slide threads cleanly without cross-threading. Spin both screws down until the screw heads make light contact with the optic body.
- Tighten incrementally in an alternating pattern: Do not torque one screw to full value while the other is loose, because that pulls the optic down crooked. Tighten the left screw halfway, switch to the right screw and tighten it halfway, then return to the left screw. This draws the sight down flat and parallel to the slide.
- Apply final torque until the driver clicks: Place your inch-pound torque driver squarely on the screw, keep it perpendicular to the slide, and rotate smoothly. Stop turning the exact instant the tool releases, slips, or clicks. Do not add an extra nudge after the click. Repeat for the second screw.
- Apply paint witness marks: Take an oil-based paint pen (white, yellow, or bright orange) and draw a thin, continuous line across the top of each screw head and onto the optic body. Once dry, this mark acts as an instant visual indicator. If a screw ever begins to vibrate loose, the paint line will crack and shift out of alignment, alerting you during routine cleaning before the optic breaks off.
- Let the glue cure: Set the pistol slide on a flat table and leave it undisturbed for a full 24 hours. Liquid threadlocker requires oxygen-free contact between metal surfaces to cure into a solid polymer. Shooting the gun before the glue cures will shatter the soft liquid and loosen the optic.
Run a Function Check to Confirm Everything Moves Freely
Once your optic is mounted and the glue has fully dried, confirm that your pistol's internal parts still work smoothly. Mounting screws can interfere with internal slide components if hardware clearances are tight.
Work through these simple verification checks before you load the handgun:
- Check the extractor plunger movement: With the slide removed from the frame, take a small punch or your fingernail and gently press the extractor claw outward, then push the depressor plunger forward from behind. The parts should spring back immediately with smooth, crisp tension. If the movement feels gritty, sticky, or completely frozen, your right-side mounting screw is rubbing against the plunger rod.
- Inspect the optic housing for movement: Grip the pistol slide firmly in one hand and grab the red dot housing with your other hand. Try firmly to rock the optic side to side, forward, and backward. There should be absolute zero movement, flexing, or clicking sounds.
- Cycle the slide by hand: Reassemble the pistol completely. Rack the slide backward and let it snap forward into battery several times. Make sure the slide travels freely without hanging up on the frame or internal linkages. Insert an empty magazine and cycle the slide to verify that the slide catch locks the action open crisply.
- Inspect the backup sights: Turn on your aiming dot. Look straight through the glass and verify you can align your backup iron sights through the optic glass. Whether your pistol is set up so the iron sights sit across the middle of the window or in the lower third of the glass, confirm that the optic housing does not completely block your view of the front post.
Choose the Right Mounting Hardware Before You Mount
Taking a few moments to choose the proper mounting hardware prevents almost every common installation failure. If your pistol uses a modular plate system rather than a direct-milled cut, look for tight-fitting steel or high-grade aluminum adapter plates that feature substantial, raised recoil posts. Thin, flat adapter plates without raised alignment posts put the entire shock of recoil onto the narrow screw shafts, which will eventually shear the screws under repeated slide cycling.
You also need to inspect your screw inventory before beginning. Screws differ in three critical ways: thread pitch (how fine the screw spirals are), overall shank length, and head taper. Always match the screw pitch precisely to your slide or plate threads, and ensure the head profile matches the cut inside your optic base. Keeping a dedicated hardware kit on hand with varying screw lengths gives you the flexibility to achieve the required 3 to 5 turns of thread engagement without protruding into internal pistol slide channels.

- ARS Mark8.8
ARS Mark is a ranking system developed by bestairriflescopes.com. ARS Mark has no relationship or impact from any manufacturers or sales agent websites. Learn more
- BrandMonstrum

- ARS Mark8.8
ARS Mark is a ranking system developed by bestairriflescopes.com. ARS Mark has no relationship or impact from any manufacturers or sales agent websites. Learn more
- BrandCVLIFE

- ARS Mark8.4
ARS Mark is a ranking system developed by bestairriflescopes.com. ARS Mark has no relationship or impact from any manufacturers or sales agent websites. Learn more
- BrandMonstrum

- ARS Mark8.0
ARS Mark is a ranking system developed by bestairriflescopes.com. ARS Mark has no relationship or impact from any manufacturers or sales agent websites. Learn more
- BrandTuFok

- ARS Mark7.8
ARS Mark is a ranking system developed by bestairriflescopes.com. ARS Mark has no relationship or impact from any manufacturers or sales agent websites. Learn more
- BrandK-Point
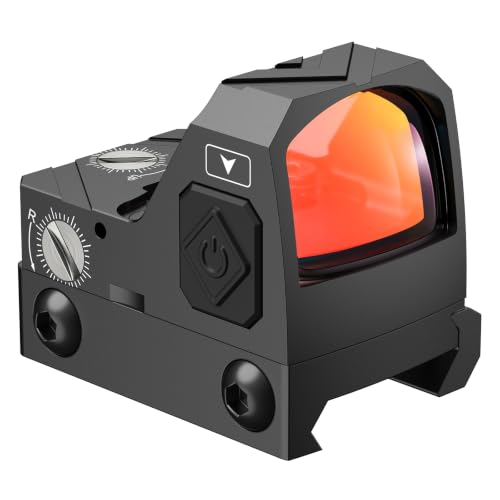
- ARS Mark7.6
ARS Mark is a ranking system developed by bestairriflescopes.com. ARS Mark has no relationship or impact from any manufacturers or sales agent websites. Learn more
- BrandCVLIFE

- ARS Mark7.6
ARS Mark is a ranking system developed by bestairriflescopes.com. ARS Mark has no relationship or impact from any manufacturers or sales agent websites. Learn more
- Brandohhunt

- ARS Mark6.6
ARS Mark is a ranking system developed by bestairriflescopes.com. ARS Mark has no relationship or impact from any manufacturers or sales agent websites. Learn more
- BrandSYEYYDS
Last update on 2026-10-02 / Affiliate links / Images, Product Titles, and Product Highlights from Amazon Product Advertising API
FAQs
Can I install a red dot if my pistol slide is not optics-ready?
Yes, you can install a red dot by using a dovetail mounting plate that replaces your factory rear iron sight. You press out the rear iron sight from its notch on the slide and drift in an adapter plate made specifically for your pistol model and optic footprint. Alternatively, you can send your bare slide to a qualified gunsmith to mill a dedicated optic pocket directly into the top of the steel.
How do I know if the mounting screws are the right length?
You can verify screw length by dry-fitting the screw into the slide without any glue. A proper screw should rotate between 3 and 5 full 360-degree turns before it snugs down flush against the optic housing. If it tightens in fewer than 3 turns, it is too short to hold recoil; if you turn it past 6 full rotations without clamping the sight down, it is bottoming out against the hole base.
What happens if the right-side screw is too long on a striker-fired pistol?
On many striker-fired handguns, the right-side screw hole is drilled directly above the narrow tunnel holding the extractor depressor plunger. If the screw is even one millimeter too long, its tip will pin the plunger rod in place, preventing the extractor claw from moving. When this happens, your pistol will fail to extract fired shell casings, causing repeated stovepipes and double-feed jams.
Can I shoot my pistol immediately after installing the red dot?
No, you should never shoot your pistol right after mounting an optic. Medium-strength liquid threadlocker needs at least 24 hours at room temperature to fully cure into a tough, solid polymer. If you shoot the gun while the threadlocker is still wet, the sharp violent shock of pistol recoil will break down the fluid, causing the mounting screws to vibrate loose within your first few magazines.


12 Best 22 Pcp Air Rifle For Hunting of 2026 With Quiet Power

7 Best 22 Pcp Air Rifle Under 300 of 2026 For Backyard Pest Control

10 Best 22 Break Barrel Air Rifles of 2026 For Backyard Pest Control

10 Best 30 Caliber Pcp Air Rifle of 2026 For Medium Game

Top Best 177 Air Rifle Under 100: Budget-Friendly Picks for 2026

How to Safely Reload Shotgun Shells at Home

11 Best Co2 Air Rifle For Pest Control of 2026 To Ensure Humane Dispatch

12 Best Inexpensive Air Rifles of 2026 For Dependable Backyard Accuracy






