How to Make a Sight Pusher from Hardware Store Parts

A shooter sits at a workbench looking at a fresh set of iron sights, dreading the thought of taking a hammer and punch to a clean handgun slide. Anyone can build a simple sight pusher using a threaded rod and a tough pusher block made from scrap hardwood or brass. This screw-driven setup slides the metal sight smoothly through its dovetail slot (the angled mounting notch on the slide) without the sharp impacts that chip finishes or break fragile glowing glass tubes.
How smoothly the project goes depends on a few key factors. Flat slides clamp easily, but curved models need scrap wood shims to stay level under pressure. Thick, high-grade bolts are vital because thin hardware can strip against tight factory fits, and the pushing block must always press against the sight base rather than the fragile top blade. Putting these simple parts together takes just a few basic steps.
Hardware Store Parts You Need to Build Your Pusher
Before you gather your supplies, make sure your workspace is completely safe. Drop the magazine from your pistol, lock the slide back, and look directly into the chamber to verify it is empty. Feel inside the chamber with your finger to confirm there is no live round. Move all ammunition to another room. Remove the slide from the frame, take out the barrel and recoil spring, and set the bare slide on your bench. You should only ever work on a completely stripped slide.
Handgun sights fit into a dovetail, which is an angled mounting slot cut into the slide. Factory sights are pressed into these slots under tight friction. While many people try to drift them sideways with a hammer and punch, a hammer blow can slip, leaving an ugly scratch on your finish. Worse, a sudden blow can shatter a tritium vial, which is the small glowing glass tube inside night sights. A screw-driven pusher applies slow, controlled sideways force so you can drift the sight through the slot smoothly.
You can build a reliable tool using standard hardware found at any local home improvement store. You do not need expensive machining equipment or specialty tools. Here is the short checklist of materials to pick up:
- Heavy-duty 4-inch or 6-inch C-clamp: Choose a cast steel or ductile iron clamp with thick, rigid arms that will not flex under pressure.
- Grade 8 fine-thread bolt (3/8-inch or 1/2-inch): Grade 8 hardened steel prevents the threads from stripping when pushing stubborn factory sights. Fine threads give you better mechanical leverage and slower, more precise travel.
- Two matching Grade 8 hex nuts: These will act as your guide channel if you mount the bolt through a bracket.
- Pusher shoe material: A small scrap of brass bar stock, dense nylon block, or hard oak cut to roughly 1/2-inch square. Brass is ideal because it is softer than the steel slide but hard enough to move the sight.
- Protective shims: Thin scrap spacers made of leather scraps, heavy cardboard, or layered masking tape to level and cushion the slide.
- Penetrating lubricant: A can of thin penetrating oil to break up factory thread sealants and metal friction.
Standard zinc-plated hardware store bolts are often made of soft Grade 2 steel. If you try to push a tight sight with a soft bolt, the threads will flatten out before the sight ever moves. Spending an extra dollar on a hardened Grade 8 bolt with fine threading ensures that every turn of your wrench transfers clean force directly into the dovetail slot.
Building the Threaded Pusher Frame Step by Step
The goal of your homemade pusher is simple: hold the slide completely square while a threaded rod pushes directly against the sight base. If the tool twists or sits at an angle, it will push the sight down into the dovetail rather than sideways, jamming it tighter or crushing the slide rail. You can assemble this setup in about twenty minutes using basic hand tools.
- Prepare the stationary anvil: If you are modifying a heavy C-clamp, the flat anvil opposite the screw will support the side of your slide. Clean off any rough casting marks with a metal file so the anvil face is smooth and flat. Glue a small piece of leather or thick cardstock to this surface to protect your handgun finish.
- Prepare the pushing screw: The swivel pad on the end of most C-clamp screws wobbles by design. For a sight pusher, wobbling is bad because it causes the tool to slip off the dovetail. Pop the loose swivel pad off the clamp bolt with a flathead screwdriver. Grind or file the tip of the bolt completely flat and square to the shaft.
- Fabricate your pusher block: Cut your brass bar or hardwood scrap into a small block about 1/2-inch wide and 3/4-inch tall. File one face completely flat. This flat face will press directly against the sight. On the opposite side of the block, drill a shallow, dimpled center hole about 1/8-inch deep. The flat tip of your driving bolt will rest inside this dimple, keeping the pusher block centered so it cannot slide out under load.
- Build a guide sleeve to prevent twisting: When you turn a bolt against metal, the turning motion wants to rotate the pusher block instead of pushing it straight. To solve this, slip a loose-fitting metal washer over the bolt tip, or place a thin strip of scrap wood along the bottom of the clamp frame. This simple guide rail lets the brass block slide forward in a straight line while stopping it from spinning with the bolt.
- Check frame alignment: Set the assembly on your bench and turn the bolt until the brass block touches the padded anvil. Look from above and from the side. The face of the brass block must meet the anvil squarely without any tilt. If you see a gap at the top or bottom, file your pusher block until the surfaces meet evenly.
Taking the extra time to ensure the pusher block travels in a straight line prevents finish damage. When metal parts twist under hundreds of pounds of screw force, they leave deep marks. A square, stable frame keeps the pressure moving in one single direction.
Preparing the Slide and Aligning the Push
Slide preparation makes the difference between a clean sight swap and a damaged pistol. Metal-on-metal contact will mar your slide coating instantly if you skip surface protection. Wrap the working area of your bare slide with three layers of blue painter tape or heavy masking tape. Cut out a small window around the dovetail slot with a utility knife so the sight itself is exposed while all surrounding metal remains covered.
Apply two drops of thin penetrating oil to the seam between the sight base and the slide dovetail. Let the slide sit on its side for fifteen minutes so the oil creeps into the tight tolerances. Many manufacturers apply thread-locking compound or protective sealants at the factory, and penetrating oil helps break that bond.
You also need to verify the direction of travel. On most modern semi-automatic handguns, rear dovetail sights are removed by pushing from left to right, looking from the back of the gun toward the muzzle. They are installed by sliding in from right to left. Always confirm your specific handgun model in its user manual before turning a wrench, because pushing the wrong way against a tapered dovetail can crack the slide slot.
If you are upgrading your pistol with taller sights, such as iron sights designed to cowitness with red dot sights, you must also confirm that your new sight base matches the dovetail profile before forcing it in. Cowitness means lining up backup iron sights through the optic glass, which requires taller sight blades. Because these taller sights have longer leverage arms, positioning your pusher tool properly is even more critical to avoid bending the tall blade.
Set your slide into the clamp assembly. Place your padded shims beneath the slide so the lower flat section of the sight sits level with the pusher block. Never support the slide by its thin bottom rails. Rest the bottom of the slide body on a firm wooden spacer so the clamping force cannot pinch or bow the rail channels.
Safe Technique for Drifting the Sight Without Damage
Once your slide is padded and clamped securely, you are ready to drift the sight. Take your time during this stage. The key to drifting a sight safely is positioning the pusher shoe at the exact right height.
- Set the contact point on the base: Position your brass pusher block so it touches only the bottom dovetail base of the sight, right where the sight enters the slide slot. Never let the block push against the upper sight blade, the rear sight notch, or the delicate tritium vials. Pushing high creates sideways leverage that will snap the sight blade off cleanly.
- Snug the assembly by hand: Turn the clamp bolt with your fingers until the brass block presses firmly against the sight base. Step back and inspect the setup from all angles. Confirm that the slide has not tilted and that the pusher block is not resting on the finished top surface of the slide. There should be a visible sliver of daylight between your pusher block and the top of the slide.
- Apply gradual wrench pressure: Place a box wrench on your clamp bolt or hex nut. Turn the wrench slowly, about one-eighth of a turn at a time. Do not jerk or hit the wrench. As pressure builds, you will feel solid resistance, followed by a light metallic pop. That sound is normal; it indicates that the factory friction bond has broken loose.
- Inspect after every quarter turn: After the initial pop, back the wrench off slightly and inspect the sight. Look closely to verify that the sight base is moving evenly through the dovetail slot without shaving metal from the slide. Continue turning slowly, checking your alignment frequently, until the old sight slides free of the slot.
- Installing the new sight: Clean the dovetail slot with a clean cotton swab and rubbing alcohol to remove old oil and debris. Slide the new sight into the slot by hand from right to left. A properly fitted sight should slide about halfway into the dovetail slot under finger pressure alone. If it stops immediately, do not force it with your pusher. Remove the sight and lightly stone the bottom flat of the sight base with fine emery paper until it enters halfway by hand. Then use your pusher rig to drive it smoothly to the center mark.
Never rush this process. If you notice the pusher block riding up over the sight base or digging down toward the slide roof, stop immediately. Back the bolt off, reset your shims, and realign the pusher block before continuing.
When Factory Sights Resist and What to Check in a Dedicated Tool
A homemade hardware store rig works remarkably well for standard adjustments and swapping sights on loose dovetails. But some factory sights are installed using hydraulic presses with hundreds of pounds of pressure, or coated in high-strength locking compound. If you find yourself leaning your full body weight into a wrench, or if you see your C-clamp frame begin to bow outward, you have reached the limit of what hardware store parts can safely handle.
Forcing a stubborn sight with an overloaded DIY rig leads to stripped bolt threads, gouged metal, or cracked slide rails. When a sight refuses to budge under reasonable pressure, switching to a dedicated sight pusher tool is the smart move to protect your pistol slide.
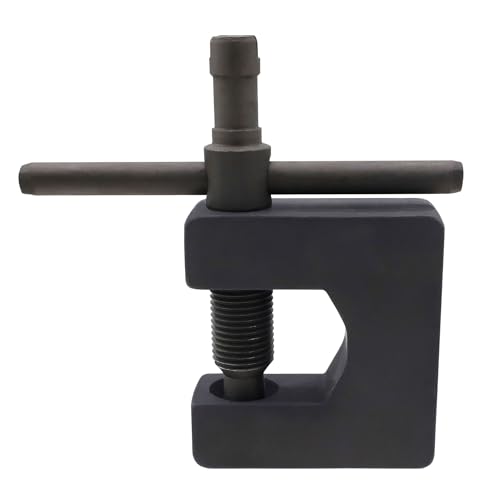
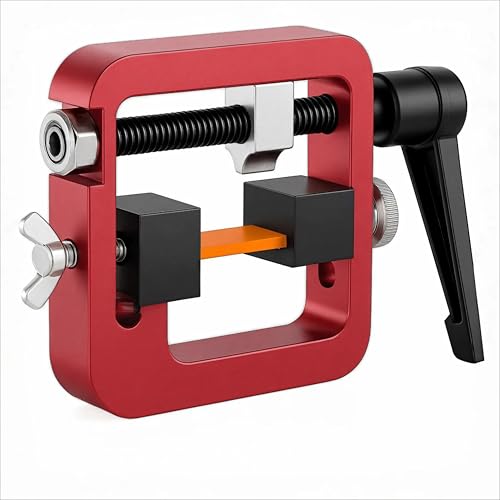
When selecting a dedicated sight pusher, keep these practical mechanical features in mind:
- Rigid surround frame: Look for a heavy, enclosed bridge frame made of thick aluminum alloy or machined steel. An enclosed frame wraps completely around the slide, preventing the tool from bowing outward under heavy torque.
- Multi-profile push heads: Different handguns use different sight angles. A tool with reversible push heads that handle both 90-degree straight sights and 30-degree angled rear sight profiles ensures flat, even contact against the base.
- Adjustable slide clamp platform: Choose a tool with an adjustable bottom platform and independent side clamping pads. This allows you to lock the slide flat and secure without putting any crushing pressure on the delicate slide rails.
- Built-in witness windows: Side cutouts in the tool frame let you watch the sight base move millimeter by millimeter, making it easy to center your new sights accurately.
A dedicated tool provides the rigid alignment and mechanical stability needed for stubborn factory fits. If your DIY setup bends or requires extreme force, stepping up to a purpose-built pusher protects your investment and makes future sight adjustments fast and painless.

- ARS Mark10.0
ARS Mark is a ranking system developed by bestairriflescopes.com. ARS Mark has no relationship or impact from any manufacturers or sales agent websites. Learn more
- BrandSporGain

- ARS Mark10.0
ARS Mark is a ranking system developed by bestairriflescopes.com. ARS Mark has no relationship or impact from any manufacturers or sales agent websites. Learn more
- BrandSporGain
- ARS Mark10.0
ARS Mark is a ranking system developed by bestairriflescopes.com. ARS Mark has no relationship or impact from any manufacturers or sales agent websites. Learn more
- BrandZOEKIM

- ARS Mark9.2
ARS Mark is a ranking system developed by bestairriflescopes.com. ARS Mark has no relationship or impact from any manufacturers or sales agent websites. Learn more
- BrandPridefend

- ARS Mark9.0
ARS Mark is a ranking system developed by bestairriflescopes.com. ARS Mark has no relationship or impact from any manufacturers or sales agent websites. Learn more
- BrandATG

- ARS Mark6.8
ARS Mark is a ranking system developed by bestairriflescopes.com. ARS Mark has no relationship or impact from any manufacturers or sales agent websites. Learn more
- BrandWEWEAL

HECASA Sight Pusher Tool, Universal Handgun Sight Adjustment for 1911/Glock/Shield/Sig,
View on Amazon- ARS Mark6.0
ARS Mark is a ranking system developed by bestairriflescopes.com. ARS Mark has no relationship or impact from any manufacturers or sales agent websites. Learn more
- BrandHECASA
- ARS Mark5.2
ARS Mark is a ranking system developed by bestairriflescopes.com. ARS Mark has no relationship or impact from any manufacturers or sales agent websites. Learn more
- BrandTuòZ
Last update on 2026-10-01 / Affiliate links / Images, Product Titles, and Product Highlights from Amazon Product Advertising API
FAQs
Can I use a wooden dowel instead of a brass block to push the sight?
Wood is generally too soft to push out tight factory dovetail sights. While hardwood works well for padding the sides of your slide, the extreme pressure needed to break the initial factory friction will crush or splinter a wooden dowel before the sight moves. A solid scrap of brass bar stock provides the ideal balance of strength and surface protection.
Which direction should I push the rear sight to remove it?
For most modern semi-automatic pistols, rear sights are pushed out from left to right as you look down the slide from behind the gun. New sights are then pressed into place from right to left. Always confirm your specific pistol model in the factory manual, because some manufacturers use straight dovetails while others cut slight directional tapers into the slide slot.
Will this homemade rig work to remove front sights as well?
This setup works for front sights that sit in a sideways dovetail slot, provided you cut a smaller brass block that fits the narrower front sight base. Handguns with screw-on front posts, such as factory Glock front sights, do not use dovetails and require a thin-walled hex socket tool rather than a pusher. Never try to push a screw-fastened front sight sideways, or you will shear off the mounting post.


12 Best 22 Pcp Air Rifle For Hunting of 2026 With Quiet Power

7 Best 22 Pcp Air Rifle Under 300 of 2026 For Backyard Pest Control

10 Best 22 Break Barrel Air Rifles of 2026 For Backyard Pest Control
10 Best 30 Caliber Pcp Air Rifle of 2026 For Medium Game

Top Best 177 Air Rifle Under 100: Budget-Friendly Picks for 2026

How to Safely Reload Shotgun Shells at Home

11 Best Co2 Air Rifle For Pest Control of 2026 To Ensure Humane Dispatch

12 Best Inexpensive Air Rifles of 2026 For Dependable Backyard Accuracy