How to Replace a Fiber Optic Front Sight at Home

A quick glance down the slide at the range bench reveals a dark, empty notch where a bright red dot used to sit. Fixing that missing glow takes just a few minutes: slide a fresh plastic light pipe through the sight post and swell both tips with gentle heat so it locks firmly in place.
The exact steps depend on matching the rod diameter to the hole in your front metal aiming blade, since a loose fit will wobble under recoil. The housing shape also matters, as some sights use an open top channel while others require threading the filament through an enclosed tunnel. Keeping the flame slightly back from the metal protects your finish and stops the plastic from scorching black. Follow these steps to clear the broken insert and seat a bright new rod cleanly.
How Do You Remove the Old Broken Fiber Rod?
Safety comes first before you pick up any tools. If you are working on a firearm, drop the magazine, pull the slide back, and physically check the chamber with your finger to ensure the firearm is completely unloaded. If you are working on an archery setup, decock the bow or place it securely in a bow vise so the bowstring cannot move while your hands are near the sight pin.
Most fiber optic front sights break when something bumps the exposed top of the glowing plastic light pipe. Even when the middle snaps off, tiny pieces of the old plastic usually stay stuck inside the front and rear holes of the sight post (the front metal aiming blade). You need to clear both ends before a new rod can slide through.
- Snip the leftover plastic bridge: If any broken piece of rod still connects the front and rear holes, cut it in half using a pair of sharp fingernail clippers or flush wire cutters. Snipping the broken bridge takes tension off the ends so they do not jam inside the metal channel.
- Pry up the melted outer beads: Look closely at the outside faces of the sight post. The old rod was held in place by melted plastic beads on each end. Take the corner of a razor blade or an ordinary hobby knife and gently lift the edge of the melted bead away from the metal. Work slowly so you do not scratch the protective finish on your slide or sight blade.
- Push the remaining stub out of the hole: Take a small, stiff wire, an unbent standard paperclip, or a thin sewing needle. Place the tip against the outside of the front hole and push the plastic stub inward toward the center gap. Repeat the process from the rear hole. The broken fragments should pop right out into the open middle notch of the sight.
- Clean the empty channel: Powder residue, holster lint, and dried oil can collect inside the tiny passage. Run a piece of plain dental floss or a soft pipe cleaner through the holes. Pulling floss through removes hidden grit that could scratch your new glowing plastic light pipe or keep it from sliding smoothly into place.
What Size Replacement Rod Do You Need to Cut?
Replacement fiber optic rods come in long, thin plastic sticks, but they are not all the same thickness. If you choose a rod that is even slightly too thick, it will jam halfway through the hole and snap when you push it. If you choose one that is too thin, the rod will rattle inside the housing and break under recoil.
Handgun front sight blades typically use rods that are either 0.040 inches (about 1 millimeter) or 0.060 inches (about 1.5 millimeters) in diameter. Archery sight pins often use much thinner fibers, such as 0.019 inches or 0.029 inches, though some heavy-duty pins also use 0.040 inches. Check the owner sheet for your sight post to confirm the exact hole diameter before you order your replacement material.
Once you have the right diameter in hand, pick your color. Green provides the highest visibility for human eyes in daylight, while red and orange offer sharp contrast against green grass, trees, and dark paper targets. When you are ready to prepare the blank piece, follow these guidelines:
- Make a clean, square cut: Do not crush the plastic with dull household scissors. Pinching the rod causes tiny micro-cracks inside the core that block light and make the aiming dot look dim. Rest the rod on a cutting board and press down firmly with a fresh razor blade to create a clean, 90-degree flat edge.
- Leave extra working length: Measure the distance between the outer ends of your sight housing. Cut your new rod about one inch longer than that measurement. You need that extra plastic as a handle so your fingers stay far away from the heat source during the next step.
- Inspect the cut tip: Look at the freshly cut end under a good desk lamp. The face of the cut should be flat and smooth. If the plastic looks ragged or torn, trim a tiny sliver off until the cut face is flat.
How Do You Melt the First Retaining Bead?
Fiber optic rods stay locked inside the sight housing without any glue or screws. They stay put because you heat the plastic tips until they melt backward into a rounded mushroom bead (a flare). That round bead becomes wider than the hole in the metal sight blade, preventing the rod from slipping out.
You always form the first bead out in the open air, before the rod enters the sight housing. Working in open space gives you plenty of room to shape the plastic without putting heat anywhere near your firearm or bow.
- Hold the rod safely: Grip the middle of your cut plastic rod with your fingers, leaving about one-quarter inch of the cut tip sticking out past your fingertips.
- Light a steady heat source: Flick a standard disposable butane lighter or light a wooden match. Keep your hands steady and shield the flame from indoor drafts or fans.
- Bring the tip toward the heat slowly: Move the cut tip of the rod toward the flame, but never place the plastic directly into the fire. Keep the tip about one-half inch to the side of the flame. The hot air radiating off the flame is all you need to soften the plastic.
- Watch for the mushroom shape: Within two or three seconds, the sharp edge of the rod will round off. The tip will curl back and expand into a smooth, shiny bead. Stop heating as soon as the bead expands to about one and a half times the thickness of the rod.
- Let the bead cool completely: Pull the rod away from the heat and hold it still in the air for ten seconds. The softened plastic hardens quickly. Do not touch the warm bead with your fingers while it cools, or you will flatten the round dome.
- Thread the rod into the sight post: Take the straight, unheated tail of the rod and push it through the front hole of the metal sight post. Slide it all the way back until your newly melted bead rests flat against the front metal surface.
How Do You Secure the Rear Bead Without Soot?
Now your glowing rod is threaded through the sight post with a solid front stop, but the back end is still loose. Securing the rear tip requires extra care because you are working right next to the metal finish of your handgun slide or bow housing. Your goal is to form a smooth rear bead that rests flush against the metal notch without leaving black soot on the dot.
- Seat the front bead tight: Push the rod forward so the front bead sits completely flush against the front metal face. Keep light forward pressure on the rod with your fingertip so it does not back out.
- Trim the rear overhang carefully: Take your sharp fingernail clippers and trim the excess rod sticking out of the rear hole. Leave only about one-sixteenth of an inch (around one to two millimeters) of plastic sticking out past the rear metal face. If you leave too much plastic, the melting bead will turn into a giant, sloppy ball that hangs over your rear notch. If you cut it too short, there will not be enough plastic to form a locking bead.
- Shield your metal finish: Wrap a small strip of blue painter tape or slide a thin piece of cardboard behind the sight post. This protects the finish on the top moving metal part of your handgun from stray heat or smoke.
- Apply indirect heat from below: Hold your lighter flame about an inch below the sight post, slightly off to the side. Since heat rises naturally, let that rising warm air drift up toward the tiny plastic nub. Watch the rear nub carefully. In a couple of seconds, the nub will soften and shrink down flat against the rear metal cup.
- Remove the heat immediately: The moment the rear bead touches the metal housing, pull the flame away. Let the sight sit untouched for thirty seconds until the plastic fully cures and locks into the housing.
What Should You Check If the Sight Looks Off?
Once the plastic cools down, run through this quick troubleshooting checklist before taking your gear to the range or into the field. Catching a loose fit or a cloudy tip now saves you from losing your sight insert during live fire.
- Check for looseness or rattle: Gently push and pull the center of the rod with the tip of your fingernail. If the rod slides forward and backward even a fraction of a millimeter, your rear bead was melted too far from the metal housing. Snip the rod in half, push the pieces out, and try again, leaving slightly less overhang before heating.
- Check for black soot or charred plastic: Look directly at the aiming dot from your normal shooting position. If the dot looks dark brown, black, or smoky, your flame got too close and burned carbon soot directly into the plastic. Burned plastic will not glow well in low light. Snip the damaged rod out and install a fresh piece, keeping the flame farther away.
- Check the brightness in natural light: Step near a window or go outside. The rod should immediately gather ambient daylight along its exposed length and direct a bright, sharp point of light straight back to your eye. If the dot looks dull, the end bead is likely misshapen or wrinkled, which scatters light in random directions instead of focusing it backward.
- Check for cracks along the body: Examine the exposed plastic tube running between the metal posts. If you see white stress lines or small cracks, the rod was bent too hard while threading it into the holes. Heavy recoil will snap a cracked rod within a few shots, so replace it immediately if you spot stress marks.
What Should You Look for in Replacement Sight Rods?
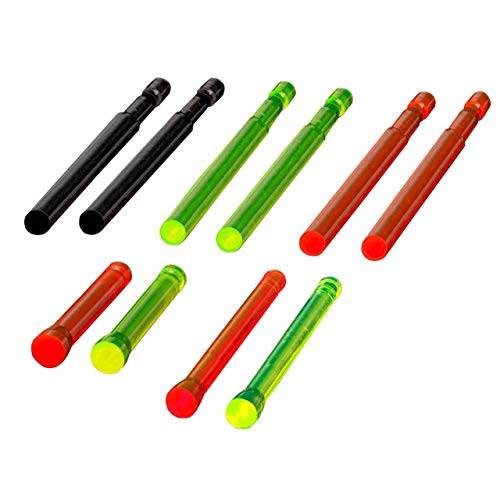
When shopping for replacement material to fix a broken front bead, standard fiber optic replacement packs are the most practical solution. These packs provide straight bundles of optical-grade plastic filaments that you cut down to fit your exact sight model. Choosing the right pack saves you time and ensures your front sight stays secure through heavy recoil and rough weather.
Always verify the rod diameter first. Check your sight manual or measure your original sight hole with a caliper to know whether you need a 0.040-inch rod, a 0.060-inch rod, or a finer archery size. Many multi-packs include several diameters and multiple bright colors like fluorescent green, vibrant red, and high-visibility orange. Having multiple colors lets you switch your front dot depending on the season, lighting conditions, or background scenery.
Material flexibility also matters. If your sight post features an open top that lets the rod sit in a straight line, standard rigid acrylic rods work well. If your sight design requires the glowing plastic to loop through an enclosed housing or wrap around a round bow pin, look for flexible replacement fibers that can bend without snapping. If you are setting up backup iron sights to cowitness through an optic, check our guide on lining up backup iron sights to cowitness with an optic to make sure your front post height and dot color give you a clean view through your sight window. For bowhunters looking to keep their pins sharp across different hunting distances, our breakdown on dialing in a bow sight with better accuracy helps you get the most out of your newly brightened sight pins.

- ARS Mark9.2
ARS Mark is a ranking system developed by bestairriflescopes.com. ARS Mark has no relationship or impact from any manufacturers or sales agent websites. Learn more
- BrandTRUGLO

- ARS Mark9.2
ARS Mark is a ranking system developed by bestairriflescopes.com. ARS Mark has no relationship or impact from any manufacturers or sales agent websites. Learn more
- BrandTRUGLO

- ARS Mark9.2
ARS Mark is a ranking system developed by bestairriflescopes.com. ARS Mark has no relationship or impact from any manufacturers or sales agent websites. Learn more
- BrandTrijicon

- ARS Mark9.2
ARS Mark is a ranking system developed by bestairriflescopes.com. ARS Mark has no relationship or impact from any manufacturers or sales agent websites. Learn more
- BrandTRUGLO

- ARS Mark9.0
ARS Mark is a ranking system developed by bestairriflescopes.com. ARS Mark has no relationship or impact from any manufacturers or sales agent websites. Learn more
- BrandMECCANIXITY

- ARS Mark9.0
ARS Mark is a ranking system developed by bestairriflescopes.com. ARS Mark has no relationship or impact from any manufacturers or sales agent websites. Learn more
- BrandMECCANIXITY

- ARS Mark9.0
ARS Mark is a ranking system developed by bestairriflescopes.com. ARS Mark has no relationship or impact from any manufacturers or sales agent websites. Learn more
- BrandMECCANIXITY
- ARS Mark8.8
ARS Mark is a ranking system developed by bestairriflescopes.com. ARS Mark has no relationship or impact from any manufacturers or sales agent websites. Learn more
- BrandHIVIZ

- ARS Mark8.8
ARS Mark is a ranking system developed by bestairriflescopes.com. ARS Mark has no relationship or impact from any manufacturers or sales agent websites. Learn more
- BrandNanoptics

- ARS Mark7.0
ARS Mark is a ranking system developed by bestairriflescopes.com. ARS Mark has no relationship or impact from any manufacturers or sales agent websites. Learn more
- BrandMECCANIXITY
Last update on 2026-10-02 / Affiliate links / Images, Product Titles, and Product Highlights from Amazon Product Advertising API
FAQs
Do you need glue to hold the fiber optic rod in place?
No, you should never use glue, epoxy, or chemical adhesives to secure a fiber optic rod in a standard sight post. The heat-formed mushroom beads on each end physically trap the rod against the metal housing. Adding liquid glue often clouds the clear acrylic core, which ruins the light-gathering properties of the tube and makes the insert extremely difficult to clean out the next time it breaks.
Why did the end of my new fiber turn black?
The tip turns black because the plastic touched the visible flame of your lighter, which deposits carbon soot and burns the synthetic material. Fiber optic rods are made of clear light-transmitting polymers that melt at relatively low temperatures. To avoid black soot, hold the rod half an inch away from the flame so that clean radiant heat softens the tip without direct flame contact.
Can you replace the fiber without removing the sight post from the slide?
Yes, you can easily replace the fiber rod while the metal sight post stays fully mounted to your firearm slide or bow bracket. In fact, leaving the sight post attached is usually preferred because you avoid drifting dovetails, loosening set screws, or altering your zero. Just remember to tape off the metal finish directly behind the post to protect it from heat while you flare the rear bead.
Will a lighter flame damage your slide finish?
A standard lighter flame can discolor delicate bluing, scorch custom slide coatings, or leave greasy soot on bare metal if held too close for too long. You can prevent finish damage by using short bursts of indirect heat rather than holding an open flame right against the slide. Placing a small strip of blue painter tape or a scrap piece of heavy paper around the sight post creates an effective thermal shield for the underlying metal.


12 Best 22 Pcp Air Rifle For Hunting of 2026 With Quiet Power

7 Best 22 Pcp Air Rifle Under 300 of 2026 For Backyard Pest Control

10 Best 22 Break Barrel Air Rifles of 2026 For Backyard Pest Control
10 Best 30 Caliber Pcp Air Rifle of 2026 For Medium Game
Top Best 177 Air Rifle Under 100: Budget-Friendly Picks for 2026

How to Safely Reload Shotgun Shells at Home

11 Best Co2 Air Rifle For Pest Control of 2026 To Ensure Humane Dispatch

12 Best Inexpensive Air Rifles of 2026 For Dependable Backyard Accuracy