How To Shoot With A Red Dot Sight

Most shooters assume that aiming with an optic means staring right at the glass to find the glowing red mark. Doing that actually slows you down, blurs the target, and makes you tilt the gun around in frustration. The true technique is to keep both eyes open and focus entirely on your target. Pushing the firearm up into your natural line of sight lets the red dot float directly over the spot you are watching.
Reaching that smooth aim depends on three simple habits. Your eyes must stay glued to the target instead of darting back to the glass. Your hands need a consistent, straight push forward so the optic arrives right in front of your eye without any fishing around. Dialing the brightness so the dot stays crisp also keeps your view sharp. Here is how to line up your focus and movement for an easy shot every time.
Focus your eyes on the target, not the dot
Shooting with a red dot sight feels strange if you are used to iron sights. With iron sights, instructors teach you to focus hard on the front sight post, leaving the target slightly blurry. When you switch to a red dot optic, you must break that habit completely.
A red dot optic works on an entirely different visual principle. If you look at the glass or stare directly at the red aiming dot, your visual focus pulls in toward the gun. Staring at the dot makes it appear to shake with every tiny tremor of your hands, which causes hesitation and jerky trigger pulls. It also pulls your attention away from what your target is doing downrange.
Think of looking through a clean car windshield. When driving, you never focus your eyes on the glass. You look through the windshield at the road ahead, watching street signs and other vehicles. The windshield is simply a clear pane you see through.
Treat your optic like that windshield. Lock your eyes onto a tiny, specific spot on your target, like a shirt button or a bullseye ring. Stare at that exact spot. As you push the firearm up into your line of sight, the red aiming dot floats into your vision and sits right over that spot. You never switch your focus back to the firearm.
Bring the gun straight up into your visual line
The most common frustration for new red dot shooters is losing the dot during the draw. You push the firearm out, look through the optic, and see only empty glass. Then your wrists tilt the gun around searching for where the dot is hiding. That delay wastes time and ruins your shooting rhythm.
This hunting happens because your presentation, which means pushing the firearm out toward the target, follows an inconsistent or curving path. With iron sights, your eyes naturally track the slide as the gun rises. With an open-window sight, the red aiming dot only appears when the optic aligns directly with your eye. If your hands finish too high, too low, or twisted, the dot stays hidden outside the glass frame.
To eliminate the search, train your arms to drive the firearm up in a clean, consistent line:
- Start at the compressed ready position with the firearm held close to your chest, your two-handed grip firm, and the muzzle pointed downrange.
- Keep your head upright and your chin level. Avoid dipping your head down to meet the optic window. The firearm must rise to meet your eye level, not your head dipping to the gun.
- Push your hands straight out toward the target, like a boxer throwing a straight punch. Keep your wrists locked in a neutral, flat position throughout the push.
- As your hands reach eye height, bring the top of the slide directly into the visual space between your dominant eye and your target mark.
- Complete the push just before your elbows lock out completely. If your wrists stay level, the red aiming dot appears inside the window over your mark without any fishing.
If the dot is missing near the top of the glass, your wrists are angling upward. If the dot is missing below, your wrists are curling down. Maintain firm, even pressure with your support hand to hold the firearm level throughout the press-out.
Keep both eyes open to preserve depth and speed
Many shooters learn marksmanship by closing their non-dominant eye. Squinting or closing one eye behind a red dot sight works against the core advantage of the optic. Closing an eye cuts your field of view in half, removes peripheral vision, and ruins your natural depth perception.
Shooting with both eyes open lets your brain combine two visual streams into one picture. Your dominant eye looks through the optic window and picks up the red aiming dot. Your non-dominant eye sees an unobstructed view of the target and its surroundings. Your brain merges these views so the red dot appears to float out on the target in real space.
Some shooters open both eyes and immediately experience double vision. You might see two distinct targets, or two separate optic frames hovering in the air. This happens when your visual focus slips away from the target and wanders back to the gun. Your eyes are crossing on the optic housing instead of focusing on the distant target.
To clear up double vision, look past the optic and lock your focus onto a sharp detail on the target, such as a printed number or staple. When your eyes lock on that distant point, the two overlapping optic frames soften into transparent outlines, and the dot settles cleanly on your mark.
Cross-eye dominance is also simple to resolve with a red dot. Cross-dominance means your dominant eye is opposite your dominant hand, such as being right-handed with a dominant left eye. You do not need to squint or tilt your head awkwardly.
Because a red dot does not require aligning two sights at different distances, simply adjust your hand path. Bring the firearm straight up from your chest, keep your head level, and shift your hands about one inch across your chest to align the optic with your dominant eye. Both eyes stay open, your neck remains relaxed, and your stance stays natural.
Set brightness correctly to stop starbursts and blur
A properly adjusted red aiming dot appears as a crisp, circular point of light that rests transparently over your target. If your dot looks like a blazing flare, an irregular smear, or a cluster of messy lines, your brightness dial is set too high.
When you push an optic to extreme brightness levels, excess light scatters across the lenses. This optical glare, known as blooming, obscures the target center and causes visual distortion that ruins shot placement.
Use this quick checklist to set and maintain the right brightness level:
- Lower the brightness dial until the dot turns slightly translucent, letting you see fine target details right through the center of the reticle.
- Set the brightness so your eye detects the dot instantly without casting glare or halo rings inside the window frame.
- Click the brightness up two or three levels when moving outdoors into bright sunlight so the dot does not wash out.
- Turn the brightness down several clicks in dim light to prevent internal glare from overpowering your vision.
Many shooters mistake common eye conditions for optic defects. An eye condition called astigmatism occurs when your cornea or lens has an irregular curvature that bends incoming light unevenly. To an eye with astigmatism, a round aiming dot can look like an oblong streak or an irregular starburst.
You can confirm whether the distortion comes from your eyes or the optic in seconds. Point your smartphone camera at the optic window and take a photo of the red dot. Camera sensors have no astigmatism. If the dot appears round in the photo but distorted to your naked eye, your eyesight is causing the starburst.
Astigmatism does not stop you from shooting accurately. Keep your brightness dial turned down to the lowest practical level to reduce the starburst effect. Keep your focus pinned on the target, and place the center of the blurred cluster onto your target mark. Bullets strike right where that center mass rests.
Build presentation muscle memory with safe dry-fire practice
Mastering the red dot presentation does not require burning through boxes of ammunition at the range. You can build the necessary muscle memory at home through safe dry-fire practice, which means practicing your draw, presentation, and trigger control with an unloaded firearm.
Safety comes first before starting any dry-fire routine. Remove the magazine, cycle the action several times to eject any live round, and place all live ammunition in a completely different room. Check the chamber both visually and physically with your finger to confirm the firearm is clear.
Once your firearm is clear and your space is safe, follow this five-minute practice routine:
- Select a small mark on an interior wall, such as a light switch screw or sticky note placed at eye level.
- Stand six to ten feet away in your standard shooting stance, locking both eyes directly on that mark.
- Hold the firearm in a two-handed grip at your chest in the compressed ready position, pointing safely toward the wall.
- Drive the firearm straight outward toward the mark in one smooth motion, keeping your wrists locked flat.
- Confirm the red aiming dot appears cleanly in your vision precisely as your arms reach natural extension.
- If the dot is missing, freeze your arms in place, identify if your muzzle is angled high or low, and make a small wrist correction to center the dot.
- Return the firearm to your chest and repeat the press-out, maintaining that corrected wrist angle.
If your firearm has backup iron sights mounted, you can review the best iron sights for cowitness with red dot sights to see how visible backup sights assist early training. Having your iron sights visible in the lower third of the optic window acts like a reference point, giving you an immediate visual cue if your presentation is misaligned. Over time, your wrists will settle into the correct angle automatically.
Practice this smooth press-out for five minutes each day. Fifty deliberate repetitions every evening will build the physical consistency needed to make the red dot appear on target every time you push the gun out.
Choose calibration and training tools to speed up progress
Getting comfortable with a red dot sight becomes much simpler when you have the right setup and practice gear on your workbench. Dialing in a newly mounted optic solely with live rounds can turn into a frustrating chore, especially if your initial shots miss the paper target completely.
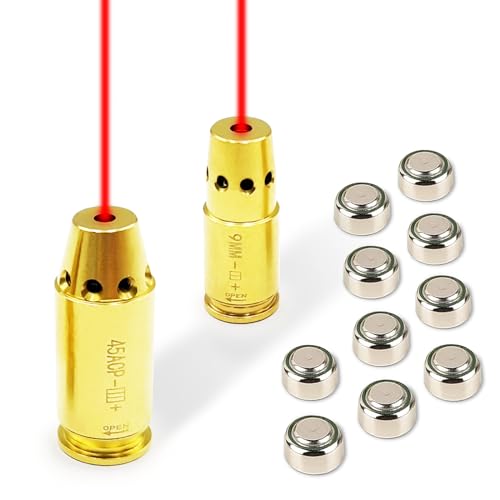
A chamber-fit laser bore sighter is one of the most useful tools for new red dot shooters. This device slips directly into the firearm chamber like an ordinary cartridge and projects a laser beam through the barrel onto a distant wall or target. By lining up your optic elevation and windage adjustment dials with the projected laser dot at home, you can establish an accurate starting zero before firing a single live round.
Zeroing means adjusting the dot so your bullets strike exactly where the dot rests at a set distance, such as 25 yards for handguns or 50 yards for rifles. Setting an initial zero with a laser calibrator ensures your first live confirmation shots at the shooting range land cleanly on paper, saving range time and ammunition.
When choosing bore sighters or training gear, verify that the device matches your exact firearm caliber, whether you shoot 9mm, .40 caliber, or .45 ACP. Check that the unit seats firmly inside the chamber without wobbling so the laser beam reflects a true bore centerline. Quality training aids and laser cartridges also allow you to practice trigger pulls at home, providing a quick laser flash on your target wall to confirm that your grip stays steady and your red dot does not jump when the trigger breaks.

- ARS Mark9.2
ARS Mark is a ranking system developed by bestairriflescopes.com. ARS Mark has no relationship or impact from any manufacturers or sales agent websites. Learn more
- BrandAde Advanced Optics

- ARS Mark8.8
ARS Mark is a ranking system developed by bestairriflescopes.com. ARS Mark has no relationship or impact from any manufacturers or sales agent websites. Learn more
- BrandDryFireTrainingCards.com

- ARS Mark8.6
ARS Mark is a ranking system developed by bestairriflescopes.com. ARS Mark has no relationship or impact from any manufacturers or sales agent websites. Learn more
- BrandBayattoo
- ARS Mark8.6
ARS Mark is a ranking system developed by bestairriflescopes.com. ARS Mark has no relationship or impact from any manufacturers or sales agent websites. Learn more
- BrandBayattoo

- ARS Mark8.6
ARS Mark is a ranking system developed by bestairriflescopes.com. ARS Mark has no relationship or impact from any manufacturers or sales agent websites. Learn more
- BrandBayattoo

- ARS Mark8.0
ARS Mark is a ranking system developed by bestairriflescopes.com. ARS Mark has no relationship or impact from any manufacturers or sales agent websites. Learn more
- BrandAudible

- ARS Mark7.8
ARS Mark is a ranking system developed by bestairriflescopes.com. ARS Mark has no relationship or impact from any manufacturers or sales agent websites. Learn more
- BrandK-Point

- ARS Mark7.4
ARS Mark is a ranking system developed by bestairriflescopes.com. ARS Mark has no relationship or impact from any manufacturers or sales agent websites. Learn more
- BrandAde Advanced Optics
Last update on 2026-10-02 / Affiliate links / Images, Product Titles, and Product Highlights from Amazon Product Advertising API


12 Best 22 Pcp Air Rifle For Hunting of 2026 With Quiet Power

7 Best 22 Pcp Air Rifle Under 300 of 2026 For Backyard Pest Control

10 Best 22 Break Barrel Air Rifles of 2026 For Backyard Pest Control
10 Best 30 Caliber Pcp Air Rifle of 2026 For Medium Game
Top Best 177 Air Rifle Under 100: Budget-Friendly Picks for 2026

How to Safely Reload Shotgun Shells at Home

11 Best Co2 Air Rifle For Pest Control of 2026 To Ensure Humane Dispatch

12 Best Inexpensive Air Rifles of 2026 For Dependable Backyard Accuracy