How to Sight in a Shotgun in Just a Few Rounds

Set up a sturdy shooting rest just ten yards from your target before loading a single shell. Starting that close lets you align your sight to get on paper right away, saving your shoulder and your wallet from punishing guesswork. Once that first cluster lands, step back to your final distance and turn the adjustment dials until your blasts group dead center.
How you finish the job depends on your gear and ammunition. Deer slugs punch single holes at fifty or one hundred yards, whereas home defense buckshot creates a wide pattern (the spread of pellets across the paper) zeroed around fifteen yards. An optic with click dials lets you nudge that spread easily, while a traditional front bead relies on how the stock rests against your cheek. Walking through each step in order keeps the process quick and painless.
What distance and ammo should you start with?
Setting up your target distance depends entirely on what your shotgun is built to do. If you built a home defense shotgun for close quarters, your working range is between 10 and 15 yards. At that distance, standard buckshot creates a tight pattern (the spread of pellets across the paper) about the size of a fist. If you hunt deer with slugs, your final zero (the exact distance where your aim matches the hit) will likely sit at 50 or even 100 yards. But you should never start sighting in at 50 yards. Starting that far out usually leads to missed paper, lost confidence, and a bruised shoulder before you even know where your gun is throwing lead.
Always pick an initial target distance of 10 to 15 yards, regardless of your final goal. At 10 to 15 yards, even an optic that is wildly misaligned will still plant a hole somewhere on a large paper backer. That gives you an immediate starting point without wasting expensive ammunition.
Ammo selection matters just as much as yardage. Shotguns produce massive pressure changes between different shell types, and different loads kick differently. A light birdshot clay load moves at a different speed than a heavy 1-ounce rifled slug or high-velocity buckshot. Barrels flex and vibrate during firing, which changes your point of impact between light shells and heavy hunting loads.
You can use low-cost birdshot to get your initial alignment close on paper at short range. But you must finish the sighting process with the exact shells you plan to hunt with or load for home defense. If you plan to carry heavy 00 buckshot, sight in with that exact buckshot brand and pellet count. If you hunt with copper sabot slugs, finish with those exact slugs. Changing your shell brand or shot weight later will move your point of impact and undo your hard work.
How do you get on paper without wasting shells?
Shotgun recoil is heavy, and firing round after round while guessing where your barrel points is a fast way to develop a flinch. You can skip the guesswork entirely by aligning your sight before you pull the trigger on live ammunition.
- Clear the firearm chamber and magazine. Safety comes first. Open the shotgun action, visually check the chamber, and remove all shells from the magazine tube. Keep the action open while you set up your gear, and point the barrel in a safe direction at all times.
- Set up a steady shooting rest. Never attempt to sight in a shotgun while standing or holding the gun offhand. Place your shotgun into a padded bench rest, shooting vise, or steady sandbags on a sturdy range table. The rest supports the weight of the gun and absorbs a portion of the recoil, letting you focus purely on alignment.
- Hang a broad target at 10 to 15 yards. Staple a large sheet of paper or cardboard with a distinct center bullseye at your short starting distance. A bigger target backer guarantees you catch stray hits even if your new sight sits off center right out of the box.
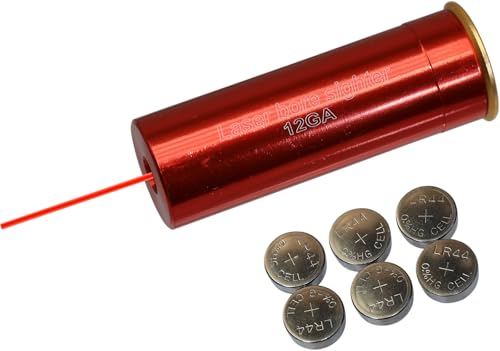
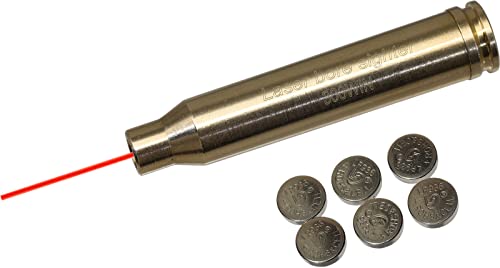
- Use a bore sighter tool. A bore sighter is a small laser tool placed in the barrel or chamber to show where the barrel points. Slide a shotgun laser cartridge into the empty chamber, or insert an arbor-mounted laser tool into the muzzle tip. The tool projects a laser dot downrange directly onto your paper target.
- Align your sight to the laser. Look through your optic while keeping the shotgun stationary in the rest. Adjust your aiming dot or iron sights until the reticle rests directly on top of the projected laser dot on the paper. Once the two dots overlap at 10 to 15 yards, turn off and remove the laser tool. Your barrel and sight are now mechanically aligned, and your first live shot is guaranteed to strike paper.
How do you shoot your first adjustment group?
Once your sight matches your bore line, you are ready to fire live shells. The goal is to shoot a tight, consistent cluster of rounds to see where the gun naturally groups its hits.
- Shoulder the shotgun with a firm grip. Sit squarely behind the bench rest. Pull the shotgun stock firmly into the pocket of your shoulder, between your collarbone and arm joint. If you hold the shotgun loosely, the recoil will slam into your shoulder bone, kick your cheek off the stock, and cause you to flinch on the next trigger squeeze.
- Squeeze the trigger on your center mark. Place the aiming dot directly over the center bullseye. Breathe out gently, hold your breath, and press the trigger smoothly straight back without jerking the gun. Keep your cheek welded to the stock until the shot goes off.
- Fire a three-round practice cluster. Never adjust your sight dials after firing a single shot. One round could easily be pushed off target by an unsteady grip, a slight flinch, or an uneven trigger pull. Fire three rounds at the exact same aiming spot to create a true pattern.
- Make the gun safe and inspect the target. Open the action, leave the shotgun resting on the bench with the chamber empty, and walk down to your target. Look at the three impacts on the paper.
- Locate the cluster center. If you fired slugs, you will see three distinct holes. Find the geographic center between those three holes. If you fired buckshot, you will see a broad pattern of pellet holes. Find the densest cluster of holes where the majority of pellets struck. Mark that central spot with a dark marker. This marked center is your true point of impact.
Which way do you turn the adjustment dials?
To move your hits toward the center bullseye, you need to adjust your optic dials. Most red dot sights and adjustable shotgun sights feature two control dials protected by screw caps. Once you unscrew the caps, you will find adjustment click dials labeled for elevation and windage.
Elevation controls the up-and-down adjustment of your hits. Windage controls the left-to-right adjustment. Every dial has an arrow showing which way to turn the screw, usually marked with "UP" and "R" (Right). Remember that these dial markings indicate the direction you want the bullet impact to move on the target, not where the dot moves inside the glass.
If your three-shot group landed 3 inches below the bullseye, you need to lift the hits upward, so turn the elevation dial in the direction marked "UP." If your shots landed 2 inches to the left of the bullseye, you need to shift the impacts toward the right, so turn the windage dial in the direction marked "R."
Understanding how much to turn comes down to click values and dot size. Most optics measure movement in minutes of angle, often shortened to MOA. Think of MOA as a simple measurement of target coverage: a fine 2 MOA aiming dot covers roughly 2 inches of a target at 100 yards, 1 inch at 50 yards, and half an inch at 25 yards. Larger 4 to 6 MOA dots cover more space, which helps you pick up targets quickly in close-quarters defense.
Adjustment dials usually shift the impact by 0.5 MOA or 1 MOA per individual click. At 100 yards, a 0.5 MOA click moves your hit by half an inch. But at shorter distances, that same click moves the bullet impact a much smaller distance. At 50 yards, a 0.5 MOA click moves the hit by one-quarter of an inch. At 25 yards, that click moves the hit by only one-eighth of an inch. If your hits sit 2 inches low at 25 yards, you will need to turn a 0.5 MOA dial 16 clicks toward "UP" to lift your hits into the center.
How do you lock down screws and confirm zero?
A 12-gauge shotgun produces violent backward recoil that can rattle accessories loose in just a few shots. If your aiming dot suddenly jumps around the paper after several good rounds, loose hardware is almost always the cause. Taking a few moments to secure your gear keeps your zero stable for years.
- Check your optic footprint and rail mount. Make sure the sight sits flat on your mounting surface. Whether your optic attaches directly to an optic footprint cut into the receiver or clamps onto standard Picatinny or 20mm slotted accessory rails, confirm that the recoil lugs fit snug inside their cross-slots without any forward or backward wiggle.
- Tighten screws with an inch-pound torque tool. Never guess mounting tightness using an ordinary hand wrench. Tighten the cross-bolts and base screws to the optic maker's exact rating (often between 15 and 25 inch-pounds) using a dedicated inch-pound torque tool. Over-tightening can snap tiny screw heads or warp the sight housing, while under-tightening lets the sight shake loose under recoil.
- Apply medium-strength thread-locking fluid. Back each mounting screw out one at a time, apply a small drop of blue removable thread-locking fluid to the threads, and torque it back down. The fluid hardens inside the threads, preventing shock waves from vibrating the screws out.
- Check alignment with backup iron sights. If your shotgun uses iron sights alongside an open-window sight or enclosed tube sight, confirm that they line up smoothly. You can learn more about how standard sights align through optic glass in our guide to the best iron sights for cowitness with red dot sights. Setting up co-witness gives you a quick visual check to ensure your dot has not shifted.
- Fire your final confirmation rounds. Move your target out to your chosen operational range, such as 50 yards for a deer slug gun. Settle the gun back into the shooting rest, load your hunting or defense shells, and fire three final rounds. If the cluster lands squarely in the center bullseye, your shotgun is officially zeroed and ready for field use.
What kind of sighting tool should you buy?
Investing in an optical bore alignment tool is the easiest way to save your shoulder and preserve costly ammunition. These tools project a straight reference beam that lets you rough-align any red dot, reflex sight, or shotgun iron sight before firing a single live shell.
When selecting an alignment tool for shotguns, look for either a 12-gauge cartridge sighter or an expanding arbor muzzle kit. Cartridge models slip directly into the shotgun chamber, showing you the exact center line of the chamber itself. Expanding muzzle kits insert into the front tip of the barrel using rubberized caliber adapters, which lets you use the same alignment tool across shotguns, rifles, and handguns.
Check the laser brightness before buying. A red laser works well for indoor ranges or low-light evening setups, while a green laser remains much easier to see against paper in bright outdoor sunlight. Choosing a tool made with durable metal housing ensures the laser stays true inside the bore, providing a steady baseline every time you swap or remount an optic.

- ARS Mark8.8
ARS Mark is a ranking system developed by bestairriflescopes.com. ARS Mark has no relationship or impact from any manufacturers or sales agent websites. Learn more
- BrandBayattoo

- ARS Mark8.8
ARS Mark is a ranking system developed by bestairriflescopes.com. ARS Mark has no relationship or impact from any manufacturers or sales agent websites. Learn more
- BrandBayattoo

- ARS Mark8.8
ARS Mark is a ranking system developed by bestairriflescopes.com. ARS Mark has no relationship or impact from any manufacturers or sales agent websites. Learn more
- BrandStanford Business Books
- ARS Mark8.2
ARS Mark is a ranking system developed by bestairriflescopes.com. ARS Mark has no relationship or impact from any manufacturers or sales agent websites. Learn more
- BrandMAYMOC
- ARS Mark8.2
ARS Mark is a ranking system developed by bestairriflescopes.com. ARS Mark has no relationship or impact from any manufacturers or sales agent websites. Learn more
- BrandMAYMOC

- ARS Mark7.6
ARS Mark is a ranking system developed by bestairriflescopes.com. ARS Mark has no relationship or impact from any manufacturers or sales agent websites. Learn more
- BrandMAYMOC

- ARS Mark7.2
ARS Mark is a ranking system developed by bestairriflescopes.com. ARS Mark has no relationship or impact from any manufacturers or sales agent websites. Learn more
- BrandMAYMOC

- ARS Mark-
ARS Mark is a ranking system developed by bestairriflescopes.com. ARS Mark has no relationship or impact from any manufacturers or sales agent websites. Learn more
- BrandMAYMOC
Last update on 2026-10-02 / Affiliate links / Images, Product Titles, and Product Highlights from Amazon Product Advertising API
FAQs
Can you sight in a shotgun using cheap target loads?
You can use low-cost birdshot loads for your first few close-range shots to get the dot roughly centered on paper. However, you should never rely on target loads for your final zero. Full-power hunting slugs and heavy buckshot produce significantly higher chamber pressures, faster barrel harmonics, and heavier recoil, which changes where the shot hits. Always finish your sighting process with the exact hunting or defensive shells you intend to carry.
What should you do if your red dot shuts off under heavy recoil?
If your optic blinks off or powers down after a heavy shotgun blast, inspect the battery cap and terminal springs first. The sudden backward snap of a 12-gauge shell can compress weak contact springs, briefly breaking electrical contact with the battery. Tighten the battery compartment securely and clean the contact points with a dry cloth. If your sight uses a motion-sensing auto-on system, verify that the battery tray is locked down according to the manufacturer specifications.
Is a red dot better than a standard bead sight on a shotgun?
A red dot offers a distinct speed and accuracy advantage because it places your aiming point and target on the exact same visual plane. You can keep both eyes wide open and focus directly on the target, which improves situational awareness and low-light shooting. Standard bead sights are simpler, highly durable, and never need batteries, but red dots allow for precise dial adjustments that make shooting slugs at longer ranges much easier.
How often do you need to re-zero your shotgun sight?
You should verify your shotgun zero at the beginning of every hunting season and before placing the gun on home defense duty. Confirm your zero whenever you change ammunition brands, switch shell weights, or remove the shotgun barrel for a deep cleaning. You should also fire a quick confirmation group if the gun experiences a hard drop or travels long distances in a vehicle over rough roads.


12 Best 22 Pcp Air Rifle For Hunting of 2026 With Quiet Power

7 Best 22 Pcp Air Rifle Under 300 of 2026 For Backyard Pest Control

10 Best 22 Break Barrel Air Rifles of 2026 For Backyard Pest Control
10 Best 30 Caliber Pcp Air Rifle of 2026 For Medium Game
Top Best 177 Air Rifle Under 100: Budget-Friendly Picks for 2026

How to Safely Reload Shotgun Shells at Home

11 Best Co2 Air Rifle For Pest Control of 2026 To Ensure Humane Dispatch

12 Best Inexpensive Air Rifles of 2026 For Dependable Backyard Accuracy