
How to Sight In an AR-15 Without Wasting Ammo

Start close on a solid shooting rest. Setting a target at twenty-five yards guarantees your first rounds hit paper instead of dirt. Fire a calm three-shot cluster, then turn the adjustment dials toward the holes until your aim point matches where the lead strikes. Centering your shots up close keeps you on target fast and saves precious brass.
A few details will steer your setup. An electronic red dot adjusts with click knobs, while standard iron sights require turning a front post or rear wheel. Your preferred distance plays a role too, since a fifty-yard target behaves differently downrange than a one-hundred-yard line. Above all, consistent hits depend on a steady rifle rest and smooth trigger pulls so body movements do not throw off your alignment. Here is how to complete each step smoothly at the firing line.
Pre-Range Setup: Securing Your Mount Before You Shoot
Before you pack your range bag or open a box of ammunition, make sure your rifle is completely unloaded and safe to handle. Drop the magazine from the lower receiver, pull the charging handle fully to the rear, and lock the bolt open. Look inside the chamber and sweep your pinky finger into the opening to confirm there is no live round waiting to fire. Always point the muzzle in a safe direction while working on your rifle at your workbench.
The single most common reason shooters burn through boxes of ammunition without hitting their target is a loose optic or wobbly iron sight base. If your sight shifts even a millimeter under recoil, your bullet impact (where the bullet hits the paper) will drift several inches off target. Take time at home to mount your optic securely onto the standard Picatinny or 20mm slotted accessory rail on top of your rifle. If you run backup iron sights with your glass, make sure both units are properly seated before you begin, as outlined in our guide on iron sights for cowitness with red dot sights.
To keep your sight rock-solid, use this quick mounting checklist:
- Degrease the rail slots: Wipe the metal grooves of your upper receiver rail with a dry cloth or rubbing alcohol to remove factory oil and dirt before clamping down any mounting brackets.
- Push forward before tightening: When you set the optic or sight clamp into the rail cross-slot, push the sight body forward toward the muzzle before tightening. Rifles recoil backward into your shoulder, so resting the mount bolt against the front face of the slot stops it from sliding during recoil.
- Use a drop of thread locker: Apply a tiny drop of blue thread-locking fluid (a liquid thread glue that prevents screws from vibrating loose under fire) to each mounting screw. Do not use red thread locker, which requires high heat to remove.
- Tighten with an inch-pound torque tool: Use an inch-pound torque tool (a small hand wrench that slips or clicks once it hits a safe tightness level) to tighten your screws to the manufacturer rating. Most scope rings and red dot bases need between 15 and 30 inch-pounds of torque. Over-tightening with an ordinary wrench can crush internal components or strip out the soft aluminum threads.
Choosing the Right Zero Distance for Your AR-15
Zeroing simply means adjusting your dot or sights so your shots land exactly where you are aiming at a specific distance. Because the sights on an AR-15 sit about two and a half inches above the center of the rifle barrel, bullets do not follow a flat, straight line like a laser beam. Instead, the bullet starts below your line of sight, climbs upward through your sight line, reaches the top of a shallow arc, and then drops back down as gravity pulls it toward the earth.
Choosing your zero distance determines how much that bullet rises and falls at typical shooting distances. The three most common zero distances for the AR-15 platform are 25 yards, 50 yards, and 100 yards:
A 25-yard zero is easy to set up on indoor ranges where space is limited. At 25 yards, the bullet crosses your aiming line on its way up. But because of that steep upward angle, a standard 5.56 or .223 bullet will hit four to six inches high at 100 yards before crossing back down around 300 yards. This large mid-range jump makes precise shooting on small targets difficult between 75 and 150 yards.
A 50-yard zero is the favorite choice for practical shooting and home defense. When you zero at 50 yards, your bullet stays within about two inches high or low from the muzzle out past 200 yards. This flat trajectory means you can put your aiming dot on the center of a target from 10 yards out to 225 yards without worrying about complex holdovers or dialing your knobs.
A 100-yard zero is popular for precision benchrest shooting and hunting. At 100 yards, the bullet hits the top of its flight path. The bullet never rises above your line of sight at any point downrange, so you only ever have to account for bullet drop as the distance grows.
For almost every shooter, starting at 25 yards is the safest strategy to get on paper quickly. Once your shots hit dead-center at 25 yards, you can move your target back to 50 or 100 yards to finalize your settings without wasting a single shot in the dirt.
Step-by-Step Range Procedure to Zero Your Rifle
Follow these numbered steps in order when you arrive at the shooting range. This procedure minimizes wasted ammunition by getting you on paper quickly and correcting your sight in controlled, predictable adjustments.
-
Set up a solid shooting rest or bench support.
Rest the front handguard of your rifle on a shooting bag or bench rest, and support the buttstock with a rear sandbag or your non-shooting hand. Reason: Trying to zero while standing or wobbling makes it impossible to separate your physical shooting mistakes from actual sight misalignment.
-
Hang a clean grid target at 25 yards.
Set up a target with clear one-inch grid squares at exactly 25 yards from the firing line. Reason: Starting at a short distance ensures your first shots hit the paper even if your new sight is pointing several inches away from the barrel.
-
Fire a steady three-shot group at the center bullseye.
Place your aiming dot or front sight post directly in the center of the bullseye and fire three calm, deliberate shots without moving your head or changing your grip. Reason: A single shot can easily be pulled off course by a flinch, but a three-shot group (a cluster of bullet holes from consecutive shots) shows where the rifle is truly pointing.
-
Measure the distance from the center of your group to the bullseye.
Call the range cold, walk down to your target, and measure how many inches your three-hole group sits away from your aiming point, both up or down and left or right. Reason: You must know the exact number of inches off target before you touch your sight adjustment dials, rather than guessing with random clicks.
-
Adjust your elevation and windage dials toward the bullet holes.
Remove the caps from your optic dials and turn your elevation (the up-and-down dial adjustment) and windage (the side-to-side dial adjustment) according to your measurements. Reason: Clicking the dials shifts the internal reticle so your aiming dot moves directly over the spot where your bullets are actually striking the paper.
-
Fire another three-shot group to verify your correction.
Settle back into your bench rest and fire three more steady rounds using the exact same aim point on the bullseye. Reason: This confirms whether your dial adjustments moved your hits into the center ring or if you need a tiny final correction.
-
Move your target to your chosen final zero distance and confirm.
Push your target out to your preferred final distance, such as 50 or 100 yards, and fire one final five-shot group to make any micro-adjustments. Reason: Fine-tuning at your intended operational distance locks in your long-range accuracy and accounts for bullet drop over greater yardage.
Turning the Dials: Optics Versus Iron Sights
Turning adjustment dials in the wrong direction is the fastest way to lose your target entirely. Optic dials and iron sights follow different rules, so you need to know which part of the sight you are manipulating before you make a change.
Red dot sights and rifle scopes make adjustments based on the point of impact (where the bullet hits paper). The adjustment caps on your optic are marked with arrows showing which way to turn the dial. The elevation dial is usually located on top of the optic body, while the windage dial sits on the right side:
- Elevation dial: Marked with "UP" and an arrow. If your group is hitting low on the target, turn the dial toward "UP" to bring the bullet holes higher. If your group is hitting high, turn the dial in the opposite direction.
- Windage dial: Marked with "R" or "RIGHT" and an arrow. If your group is hitting to the left of your aim point, turn the dial toward "R" to push the bullet holes to the right. If your group lands to the right, turn the dial the opposite way.
Most optic dials move in fractions of an MOA (minute of angle, a unit of measurement that covers about one inch per 100 yards). Many red dots adjust at 0.5 MOA per click. At 100 yards, two clicks will move your bullet hole one full inch. But when you are standing at the 25-yard line, that same single click moves the bullet only one-eighth of an inch. That means you need eight clicks to move your bullet impact one inch on paper at 25 yards.
Iron sights work differently because you are moving mechanical posts instead of internal optical prisms. An AR-15 rear sight controls windage, while the front sight post controls elevation. The rear sight follows the same rule as a red dot: turn the windage knob toward "R" to move your bullet hit to the right. But the front sight post works in reverse:
The front sight post has a small spring-loaded detent pin that locks into notches around the post base. To raise your bullet impact, you must screw the front sight post down (clockwise) into the base. Screwing the post down forces you to point the rifle barrel higher in the air to see the sight. To lower your bullet impact, you must unscrew the front sight post up (counter-clockwise).
Troubleshooting Wide Groups and Stray Shots
If your shots are scattering across the paper in an open pattern larger than three or four inches at 25 yards instead of forming a tight, touching cluster, stop turning your dials. Clicking your sights will not fix erratic shot patterns. Check these common physical causes first:
- Resting the barrel on the bench: Always rest the handguard of your rifle on your support bag, never the exposed steel barrel. Resting the barrel directly on a hard surface or sandbag deflects the barrel upward during firing and sends rounds wild.
- Shifting head position and eye relief: Ensure your cheek rests on the buttstock in the exact same spot for every single shot. If you lift your chin or turn your head between rounds, your eye angle changes through the optic window, causing the dot to look misaligned against the target.
- Jerking the trigger: Squeeze the trigger straight back with smooth, steady pressure using the center pad of your index finger. Slapping the trigger or bracing for the recoil will drive your muzzle down and to the side right as the firing pin strikes.
- A loose sight or rail mount: Grasp your optic or iron sight with your hand and give it a firm twist. If you feel any wiggle or hear a click, your mounting screws have worked loose and need to be retorqued.
- Mixing different ammunition boxes: Sighting in with a 55-grain target round and then switching to a heavy 77-grain defense bullet will shift your zero by several inches. Stick to one specific ammunition brand and bullet weight until your zero is completely dialed in.
Tools and Sights That Make Zeroing Easier
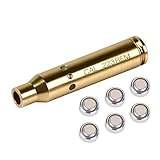
Having the right bench gear can cut your sighting-in time down to ten minutes and save boxes of expensive cartridges. If you dread wasting ammunition on wild shots, a caliber-specific laser bore sight is one of the most practical accessories you can keep in your range bag. A bore sight is a small cartridge-shaped device or chamber laser that shines a focused red beam directly down the center of your rifle barrel.
By chambering a laser bore sight at home or in your garage, you can point your rifle at a wall 25 yards away and adjust your red dot or iron sights until they sit directly on top of the red laser dot. This mechanical alignment process puts your barrel and your sight on the exact same target plane before you ever pull a trigger. When you step onto a live range, your very first shot will already be on paper, requiring only a few final dial clicks to achieve a true live-fire zero.
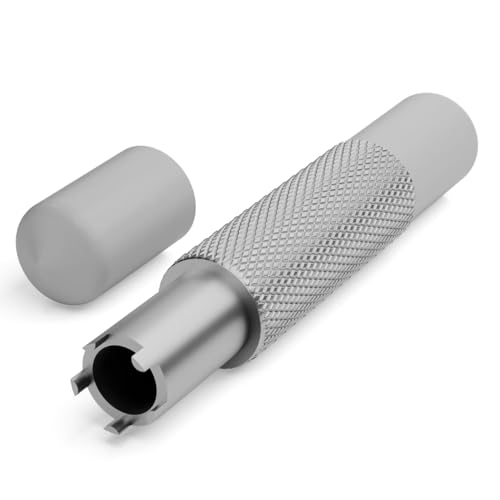
If your rifle features a standard A1 or A2 front iron sight post, a dedicated front sight adjustment tool is another valuable bench aid. These small, durable steel tools slide over the front post and grip the locking detent pins simultaneously, allowing you to rotate the post without gouging the finish or marring the metal with a knife blade or bullet tip. When choosing accessories, verify that they match the specific .223 Remington or 5.56mm NATO chambering of your rifle and feature solid metal bodies that hold up to repeated field use.

- ARS Mark9.0
ARS Mark is a ranking system developed by bestairriflescopes.com. ARS Mark has no relationship or impact from any manufacturers or sales agent websites. Learn more
- BrandCVLIFE
- ARS Mark8.8
ARS Mark is a ranking system developed by bestairriflescopes.com. ARS Mark has no relationship or impact from any manufacturers or sales agent websites. Learn more
- BrandMidTen

- ARS Mark8.8
ARS Mark is a ranking system developed by bestairriflescopes.com. ARS Mark has no relationship or impact from any manufacturers or sales agent websites. Learn more
- BrandVisiofire
- ARS Mark8.6
ARS Mark is a ranking system developed by bestairriflescopes.com. ARS Mark has no relationship or impact from any manufacturers or sales agent websites. Learn more
- BrandPIHSSFULL

- ARS Mark8.6
ARS Mark is a ranking system developed by bestairriflescopes.com. ARS Mark has no relationship or impact from any manufacturers or sales agent websites. Learn more
- BrandAISUNOUTDOOR

- ARS Mark8.6
ARS Mark is a ranking system developed by bestairriflescopes.com. ARS Mark has no relationship or impact from any manufacturers or sales agent websites. Learn more
- BrandFeyachi

- ARS Mark8.0
ARS Mark is a ranking system developed by bestairriflescopes.com. ARS Mark has no relationship or impact from any manufacturers or sales agent websites. Learn more
- BrandGeneric

- ARS Mark8.0
ARS Mark is a ranking system developed by bestairriflescopes.com. ARS Mark has no relationship or impact from any manufacturers or sales agent websites. Learn more
- BrandFeyachi

- ARS Mark7.6
ARS Mark is a ranking system developed by bestairriflescopes.com. ARS Mark has no relationship or impact from any manufacturers or sales agent websites. Learn more
- BrandNanchroadly

- ARS Mark7.6
ARS Mark is a ranking system developed by bestairriflescopes.com. ARS Mark has no relationship or impact from any manufacturers or sales agent websites. Learn more
- BrandFeyachi
Last update on 2026-10-02 / Affiliate links / Images, Product Titles, and Product Highlights from Amazon Product Advertising API
FAQs
What is the difference between boresighting and zeroing?
Boresighting uses a laser or optical tool to line up your sight with the rifle barrel before shooting. Zeroing is the actual live-fire process of shooting groups at a set distance and dialing the sight to match where live bullets strike the paper. Boresighting gets your first shots onto the paper target, but only a live-fire zero can confirm true accuracy.
Can you sight in an AR-15 completely at home without shooting?
You cannot finish a true zero at home because a laser cannot simulate bullet drop, ammunition velocity, barrel vibration, or weather conditions. However, you can use a laser bore sight at home to align your dot with the barrel at 25 yards. This pre-alignment ensures you are roughly on target so you only need a handful of rounds at the range to finish.
Why does my red dot look like an uneven cluster of stars instead of a round dot?
If your red dot looks like a blurry starburst or smear, you likely have astigmatism, which is a common eye irregularity that affects how your eye focuses light. You can confirm this by taking a photo of the red dot with your smartphone camera. If the dot looks crisp and perfectly round on your phone screen, the optic is working fine and your eye is distorting the light.
How many rounds of ammunition does it usually take to sight in an AR-15?
If you start at 25 yards with a stable bench rest or use a laser bore sight first, you should be able to sight in a rifle with 9 to 15 rounds. That allows for an initial three-shot group, an adjustment, a second three-shot confirmation group, and a final group at your preferred zero distance. Missing the target or guessing on dial clicks is what causes shooters to waste 50 rounds or more.


12 Best 22 Pcp Air Rifle For Hunting of 2026 With Quiet Power

7 Best 22 Pcp Air Rifle Under 300 of 2026 For Backyard Pest Control

10 Best 22 Break Barrel Air Rifles of 2026 For Backyard Pest Control

10 Best 30 Caliber Pcp Air Rifle of 2026 For Medium Game

Top Best 177 Air Rifle Under 100: Budget-Friendly Picks for 2026

How to Safely Reload Shotgun Shells at Home

11 Best Co2 Air Rifle For Pest Control of 2026 To Ensure Humane Dispatch

12 Best Inexpensive Air Rifles of 2026 For Dependable Backyard Accuracy






