
How to Sight In Iron Sights Without Wasting Ammo

Missing the mark with brand-new sights is completely normal, so there is no need to worry. To get on target fast, rest the firearm on a solid support, shoot a three-round cluster, and follow one mechanical rule: move your rear sight the direction you want bullet holes to shift, but move the front sight the opposite way. Repeating that rhythm quickly walks your hits straight into the center.
The exact steps depend on your gear. Rifles often feature click-adjustable dials or a front post that needs a small pronged wrench, while handguns usually require gently tapping a rear notch sideways. Your starting distance matters too, since beginning close at ten or fifteen yards saves ammunition before you confirm your aim farther out. The guide below breaks down the adjustments step by step so you can dial in your shots cleanly.
What gear do you need before heading out?
Sighting in your firearm goes much smoother when you bring the right equipment to the bench. Showing up with just a box of cartridges and a target usually leads to wasted range fees and spent ammunition. Before you load any gear into your range bag, make sure your firearm is completely unloaded with the magazine removed and the chamber cleared.
Having a few simple items on hand allows you to isolate your firearm mechanically so you know whether a stray bullet came from your sights or from your hands.
- A steady bench rest: Solid sandbags or a dedicated bench rest block keep your firearm still. If you try to zero your sights while standing or resting your elbows on a wobbly table, your natural muscle tremors will throw off your bullet impacts.
- Grid targets with one-inch squares: Plain paper plates make it hard to tell how far off you are. Sight-in targets with printed one-inch grid lines tell you at a glance how many inches you must move your sights up, down, left, or right.
- A marker or adhesive target pasties: Marking every bullet hole with a pen or bright sticker lets you track your progress without confusing old shots with new shots.
- The right adjustment tools: Rifles with post-style front sights often require a dedicated pronged adjustment key to press down the detent pin and rotate the post. Handguns may require a small flathead screwdriver or a sight pusher tool. Trying to turn a sight post with a pocket knife or cartridge tip often scratches the finish or strips the metal notch.
- Uniform ammunition: Use the exact brand, bullet weight, and load you intend to shoot regularly. A heavy hunting bullet will strike a target at a different height than light target practice rounds.
Which way do you move your iron sights?
Turning an adjustment knob the wrong direction is the most common mistake shooters make. When you turn a screw the wrong way, your next shot lands even further from the bullseye. This burns through ammunition and leaves you guessing where things went wrong.
The universal rule for adjusting iron sights boils down to four simple words: Front Opposite, Rear Same. You can remember this with the acronym FORS. It tells you which direction to shift each sight component based on where your bullet hits the paper.
Your rear sight always moves in the direction you want the bullet hole to move. If your shots land three inches to the left of the bullseye, you need your bullets to move to the right. Therefore, you shift your rear sight to the right. If your shots hit low, you move your rear sight up. The rear sight always guides the point of impact toward your target.
Your front sight works the opposite way. If your shots hit low, you must lower the front sight post. Lowering the front post forces you to tilt the muzzle of the firearm upward when you line up the sights, which lifts your bullet path on the target. If your shots hit high, you screw the front sight post upward. Raising the post forces you to push the muzzle downward to center the post in the rear opening, dropping your shots back down to the center.
How do you walk your shots on target?
Lining up sights so bullets hit where you aim is a methodical process. Rushing through your shots or adjusting dials after every single pull of the trigger creates endless confusion. Follow these numbered steps to walk your rounds into the bullseye systematically.
- Start at a close distance: Set your target at 10 to 15 yards for a handgun, or 25 yards for a rifle. Starting at 100 yards right away makes it easy to miss the entire paper backer, leaving you with no idea where your bullets landed. Getting centered at close range guarantees you stay on paper when you move out farther.
- Establish a clean sight picture: Rest your firearm on your sandbags so it points naturally at the center of the target. Align the front post directly in the middle of your rear sight notch or ring. The top of the front post should sit completely flush with the top edges of the rear notch, with the bullseye resting right on top of the post.
- Fire a three-shot group: Fire three rounds at the center target, pressing the trigger smoothly each time without rushing. Never adjust your sights after firing just one shot. A single round can land off-target due to a slight flinch or wind gust. A cluster of three holes shows you where the firearm actually points.
- Measure the distance to center: Walk downrange or use spotting binoculars to inspect your three-shot cluster. Find the center point between the three holes and count the target grid squares to see how many inches it sits from the bullseye. Note whether the cluster is high, low, left, or right.
- Make your mechanical corrections: Use your adjustment tool or finger dials to adjust your sights based on the golden rule. For example, if your rifle hits two inches left and two inches low at 25 yards, move your rear windage dial to the right and lower your front sight post. Check your sight manual to see how many clicks equal one inch at your chosen distance.
- Confirm with another three-shot group: Fire three more rounds at the same target spot using the exact same aim. Your new cluster should surround the center ring. Once your group lands dead center at close range, move your target out to your final distance, such as 50 or 100 yards, and fire a final confirmation group.
How do rifle sights differ from handgun sights?
The mechanical parts you adjust depend heavily on whether you are working with a long gun or a pistol. Knowing how your specific firearm moves its sights prevents you from forcing a stuck part or damaging your slide.
Rifles commonly use click-adjustable aperture sights mounted on standard Picatinny or 20mm slotted accessory rails. The rear assembly usually features a click dial for windage, which controls left-to-right adjustment. Many rear rifle sights also feature two different peepholes: a large ring for quick close-range targets and a small hole for precise shooting. The front sight on standard rifle platforms is a threaded post held in place by a tiny spring-loaded pin. To adjust elevation, which controls up-and-down adjustment, you push that pin down and turn the post clockwise to lower it or counterclockwise to raise it.
Many modern defensive rifles feature folding backup sights paired with an optic. If you run both systems together, you might look into the best iron sights for cowitness with red dot sights so your backup posts align cleanly through your optic window if your battery fails.
Handguns work quite differently because most factory pistol slides use fixed drift sights. Instead of turning click dials, the rear sight sits snugly inside an angled dovetail slot cut directly into the steel slide. To adjust windage on a handgun, you must push the entire rear sight base sideways across the slide. Doing this with a hammer and a steel punch can gouge your finish, so a dedicated screw-driven sight pusher tool is the preferred method. Handgun elevation is usually fixed from the factory, meaning you must adjust where you hold your front post on the target or swap out the front blade for a taller or shorter piece.
Why are your shots scattering all over the paper?
If your bullet holes look like a scattered pattern of buckshot rather than a tight, neat cluster, you cannot zero your firearm. Sighting in requires a consistent grouping before your mechanical adjustments will mean anything. If your rounds wander unpredictably across the paper, run through this troubleshooting checklist before touching your sight dials again.
- Loose sight bases: Firearm recoil causes heavy shock waves that shake loose parts over time. Check the mounting screws holding your iron sights to your slide or rail. Sights that shift even a fraction of a millimeter between rounds will send bullets flying inches off target. Secure your base screws using an inch-pound torque tool according to the manufacturer specifications, and use a small drop of thread-locking fluid on the screw threads.
- Inconsistent eye focus: Your eyes cannot focus clearly on three different distances at once. If you try to look at the rear sight, front sight, and target all together, your vision will blur and your muzzle will wander. Keep your sharpest visual focus on the tip of the front sight post. Let the rear aperture and the distant target appear slightly soft.
- Inconsistent cheek weld: Placing your face in a slightly different spot on the rifle stock for each shot alters the angle at which your eye peers through the rear ring. Make sure your cheek firmly presses against the exact same spot on the comb of the stock for every single trigger press.
- Trigger jerk: Jerking the trigger right as the gun goes off drives the muzzle downward and sideways before the bullet exits the barrel. Place the flat pad of your index finger across the center of the trigger shoe and squeeze slowly straight back toward your shoulder. Let the shot break as a smooth surprise.
What should you look for in backup sights?
When selecting a set of backup iron sights, mechanical repeatability is the most critical feature to look for. Sights must fold down out of your field of view when using an optic, yet snap upright and lock solidly in place without shifting their zero when called upon.
Check the locking mechanism on the folding base before choosing a set. Spring-assisted push buttons allow the sights to deploy instantly with a single touch, while manual detent sights require you to pull them up by hand. Ensure the hinge mechanism has zero wobble when locked in the upright position. Any play in the folding hinge will cause your point of impact to drift every time the sights bounce inside a gun case.
Look closely at how the windage and elevation adjustments operate. Tool-free adjustment knobs let you make fast windage corrections at the range using just your fingers, which saves time. However, sights that require a dedicated adjustment tool or a flathead screwdriver offer a lower profile and are less likely to get bumped out of alignment accidentally during transport. Choose the style that best balances quick field adjustments with snag-free durability for your setup.

- ARS Mark9.6
ARS Mark is a ranking system developed by bestairriflescopes.com. ARS Mark has no relationship or impact from any manufacturers or sales agent websites. Learn more
- BrandTRUGLO

- ARS Mark9.0
ARS Mark is a ranking system developed by bestairriflescopes.com. ARS Mark has no relationship or impact from any manufacturers or sales agent websites. Learn more
- BrandVisiofire

- ARS Mark9.0
ARS Mark is a ranking system developed by bestairriflescopes.com. ARS Mark has no relationship or impact from any manufacturers or sales agent websites. Learn more
- BrandVisiofire
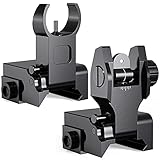
- ARS Mark8.8
ARS Mark is a ranking system developed by bestairriflescopes.com. ARS Mark has no relationship or impact from any manufacturers or sales agent websites. Learn more
- BrandMarmot

- ARS Mark8.6
ARS Mark is a ranking system developed by bestairriflescopes.com. ARS Mark has no relationship or impact from any manufacturers or sales agent websites. Learn more
- BrandAISUNOUTDOOR

- ARS Mark8.6
ARS Mark is a ranking system developed by bestairriflescopes.com. ARS Mark has no relationship or impact from any manufacturers or sales agent websites. Learn more
- BrandOZARK ARMAMENT

- ARS Mark8.6
ARS Mark is a ranking system developed by bestairriflescopes.com. ARS Mark has no relationship or impact from any manufacturers or sales agent websites. Learn more
- BrandOZARK ARMAMENT

- ARS Mark8.2
ARS Mark is a ranking system developed by bestairriflescopes.com. ARS Mark has no relationship or impact from any manufacturers or sales agent websites. Learn more
- BrandGVN
Last update on 2026-10-02 / Affiliate links / Images, Product Titles, and Product Highlights from Amazon Product Advertising API
FAQs
What distance should you start sighting in at?
Start sighting in at a close distance between 10 and 25 yards. Starting close keeps your first shots on the paper target so you can clearly see where the rounds strike. Once your three-shot groups land directly in the bullseye at close range, move your target out to your final preferred zero distance.
Why do front and rear sights move differently?
The rear sight sits closest to your eye and acts as the pivot guide for where the bullet impacts. Shifting the rear sight points the barrel directly in the direction you want the bullet to go. The front sight acts as the front pivot point, so lowering the front post tilts the barrel upward, which raises your shot placement on the paper.
Can you sight in without firing live ammunition?
You can use a laser bore sighter or look directly down the bore of an unloaded bolt-action rifle to get your sights close to center without firing. This initial alignment gets your crosshairs or iron posts on paper before you begin live firing. However, you must always confirm and fine-tune your final zero with live ammunition to account for bullet drop, recoil, and velocity.
How tight should your mounting screws be?
Mounting screws should be tightened according to the manufacturer listed inch-pound torque rating, which typically ranges between 15 and 25 inch-pounds for small sight screws. Never guess or over-tighten them by hand with an ordinary wrench, as this can strip the screw threads or crack the sight base. Using an inch-pound torque tool with a drop of medium-strength thread-locking fluid keeps everything firmly locked in place under repeated recoil.


12 Best 22 Pcp Air Rifle For Hunting of 2026 With Quiet Power

7 Best 22 Pcp Air Rifle Under 300 of 2026 For Backyard Pest Control

10 Best 22 Break Barrel Air Rifles of 2026 For Backyard Pest Control

10 Best 30 Caliber Pcp Air Rifle of 2026 For Medium Game

Top Best 177 Air Rifle Under 100: Budget-Friendly Picks for 2026

How to Safely Reload Shotgun Shells at Home

11 Best Co2 Air Rifle For Pest Control of 2026 To Ensure Humane Dispatch

12 Best Inexpensive Air Rifles of 2026 For Dependable Backyard Accuracy






