
What Is the Basic Rule for Sight Adjustment?

A shooter peers downrange through the drift of gray smoke and spots a tight cluster of holes punched low and to the left of the bullseye. The universal fix is simple: move the rear sight or optic dial in the direction you want the bullet hole to travel. Dialing toward "Up" pushes future shots upward. However, front sight posts work in reverse, so move a front sight post opposite to where you need the shot to go.
A few details change how you apply this rule at the shooting bench. Most red dot dials feature printed arrows indicating where the bullet will shift, while mechanical iron sights rarely give you hints. Your shooting distance also changes the math, since a single click moves your impact much farther at one hundred yards than it does at twenty-five yards. Here is how to dial in your target without wasting ammunition.
Which Way Should You Turn Your Sight Adjustments?
The universal rule for sight adjustment comes down to which part of the sight you are touching. If you are turning a dial on a red dot sight, a rifle scope, or a rear iron sight, move the sight in the exact direction you want your bullet hole to move. If your shots hit to the left, move the rear sight or optic dial to the right. If your shots hit low, move the rear sight or dial up.
Front sight posts follow the exact opposite rule. If you are adjusting a front post on an iron sight, move the post opposite the direction you want the bullet impact to move. To make your shots hit higher, you must lower the front post down into the sight base. To make your shots move to the right, you push the front post to the left.
Every sight has two directional controls: windage and elevation. Windage is the side-to-side adjustment that moves your shot left or right across the target. Elevation is the up-and-down adjustment that moves your shot higher or lower. Remembering this distinction prevents you from spinning the wrong turret while trying to bring a shot back into the bullseye.
Shooters often call this concept chasing the bullet or chasing the hole. With rear sights and red dot turrets, you chase your intended target: steer the dial toward where you want the shot to go. With front sight posts, you move away from your intended target. Keeping this split clear in your mind stops you from walking your bullet holes further off paper.
How Do You Fix Shots Hitting Low and Left?
Imagine you sit down at the shooting bench, load your firearm, and aim straight at the red center of your target. You squeeze the trigger five times, clear the firearm chamber, remove the magazine, and look downrange. All five holes sit tight together, but they are three inches below the center and two inches to the left. Here is how you solve that problem step by step without wasting ammunition.
- Verify your bullet group first. Never touch a sight screw after a single bad shot. A slight twitch of your trigger finger or an unsteady breath can throw one round off target. Always shoot a steady group of three to five rounds at the same point of aim (the spot on the paper where your sight reticle or iron post is pointing) so you know where the firearm naturally groups before making changes.
- Correct your elevation first. Your shots landed low, which means you need the point of impact (the physical hole where the bullet strikes the paper) to move up. On a red dot sight or scope, look at the top dial. Turn the dial toward the arrow labeled "UP." If you are working on an adjustable rear iron sight, turn the elevation screw so the rear notch physically rises.
- Adjust your windage next. Your shots landed to the left, which means you need the bullet holes to move right. Look at the side dial on your optic. Turn that dial in the direction marked "R" or "RIGHT." If you are using a rear iron sight, drift or click the rear aperture to the right.
- Handle a front sight post correctly if using fixed irons. If your rifle has a fixed rear sight and an adjustable front post, you must reverse your thinking. Because your shots are hitting low, you need the bullet path to rise. Screw the front sight post downward into its housing. If your front post also handles windage, push the post to the left so the bullet impact moves to the right.
- Confirm your adjustment with a fresh group. Pick up your firearm, settle into your rest, and aim at the center bullseye again. Fire three more rounds. If your adjustments were correct, your group will have walked diagonally up and right into the center ring.
Do Red Dots Adjust Differently Than Iron Sights?
Red dot sights and traditional iron sights use different mechanical designs, but their adjustment dials follow the same general logic. Modern open-window sights and enclosed tube sights are built specifically to eliminate mental guesswork. The manufacturer stamps arrows right on the turret caps or housings showing "UP" and "R" for right.
Those optic arrows show the direction your bullet impact will travel, not the movement of the internal lens. When you twist the windage dial toward "R," the internal aiming dot shifts so your barrel points further right the next time you align the dot with the target. You do not need to visualize internal mirrors or prisms. Just look at the arrow and turn the screw toward where you want the bullet hole to go.
Iron sights require a bit more visualization because you are aligning two separate metal pieces across the top of the barrel. When you look through a rear notch at a front post, your eye creates a straight sight line. If you move the rear notch to the right, your eye forces the muzzle of the barrel to point further right to realign the sights. That is why rear sights move in the same direction as your desired bullet hole.
The front sight works on a fulcrum balance. Raising the front sight post forces you to push the muzzle downward to line the post back up with your rear notch, causing the gun to shoot lower. If you run both systems together by lining up your backup iron sights through the optic glass, make sure you zero your red dot independently from your iron posts rather than trying to adjust both at the exact same moment.
How Does Target Distance Change Your Click Count?
Every time you turn a sight dial, you feel or hear an individual click. That click represents an angular shift, not a fixed measurement like an inch on a ruler. Because the movement is an angle, the distance between your bench and the target completely changes how far each click moves your bullet hole on the paper.
Most optics and sights measure these angular shifts in minutes of angle, often shortened to MOA. An angle of 1 MOA spreads out as it travels downrange, covering roughly one inch of target face at 100 yards. At shorter distances, that same angle covers much less space, while at longer ranges it spreads out even wider.
- At 100 yards: A common 1/2 MOA click dial shifts your bullet impact about half an inch on the paper. If your shot hits two inches low at this range, turning the dial four clicks toward "UP" brings you straight to the center.
- At 50 yards: The distance is cut in half, so your bullet travels only half as far before hitting the paper. That same 1/2 MOA click now shifts the bullet hole only 1/4 of an inch. Moving your shot two inches higher at 50 yards requires eight clicks instead of four.
- At 25 yards: This is a standard distance for zeroing handguns and setting up precise target shooting with rimfire pistols. At 25 yards, a 1/2 MOA click moves your shot only 1/8 of an inch. If your shots land two inches off center at 25 yards, you will need 16 full clicks to shift your group into the bullseye.
Always verify the click value stamped on your sight housing before you start twisting dials. Some optics use 1/4 MOA clicks, while others use 1/2 MOA or even 1 MOA clicks. Knowing your distance and your dial rating lets you calculate the exact number of clicks you need, saving you from chasing groups all afternoon.
What Should You Check Before Turning Any Dials?
Many shooters assume their sights are misaligned when the true culprit is poor shooting technique or loose hardware. Adjusting your dials to fix a loose screw or a bad bench setup creates endless frustration because the firearm will never hold a zero. Run through this quick checklist before you touch your adjustment screws.
- Rest the firearm on a solid bench support. Do not attempt to zero your sights while standing on two feet or resting your elbows on your knees. Rest the forearm of the stock on sandbags, a shooting sled, or a firm bench block. A solid support isolates the firearm from your heartbeat and muscle fatigue, guaranteeing you are checking the sight alignment rather than your own balance.
- Check your optic mounting screws. Recoil and engine vibration from transport can work loose screws over time. Check the screws connecting your sight to the rail using an inch-pound torque tool, and confirm you used thread-locking fluid during installation. If the optic wiggles even a fraction of a millimeter on its mount, your bullet impact will drift randomly with every single shot.
- Inspect your dot size and focus. If your red dot looks like an irregular starburst, turn down the illumination brightness. A dot that is set too bright for the ambient light can flare in your eye, making the dot cover too much of the target and hiding your true point of aim. A clean, crisp dot allows you to place the center of the reticle on the exact same spot for every shot.
- Use identical ammunition throughout the session. Different bullet weights, gunpowder loads, and bullet shapes travel at different speeds and drop at different rates. If you fire three heavy rounds and then switch to three light target rounds, your point of impact will shift naturally. Stick to one specific cartridge box until your sight is completely adjusted.
What Tools Make Sight Adjustments Faster and Easier?
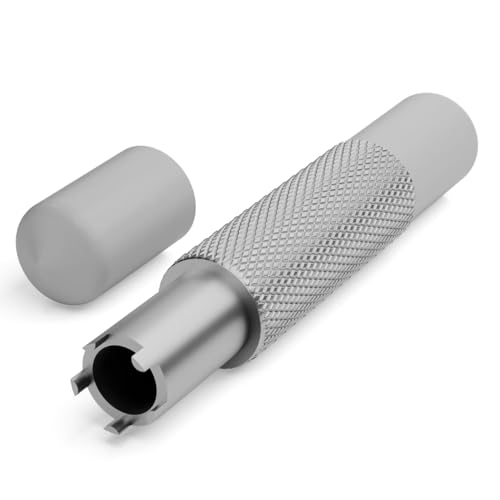
While most modern red dot sights can be adjusted with a coin, a flathead driver, or built-in turret caps, certain specialized tools make zeroing far simpler. If your setup includes military-style iron posts, adjusting elevation by hand is nearly impossible. These front posts sit down inside protective metal ears and lock into place with spring-loaded detent pins.
Front sight adjustment tools are dedicated metal keys built with four or five prongs that slide down over the post. They push the spring detent down while engaging the notches on the post, letting you turn the sight smoothly without slipping or scratching the finish. Dedicated clamp-style tools also exist for platforms that require mechanical drifting to adjust windage on front posts.
Another helpful item to keep in your range bag is a laser bore sight. These small devices fit directly into your firearm chamber or attach to the muzzle to project a straight red beam down the barrel. By aligning your optic dot with the laser dot on a wall at home before you head to the range, you ensure your first live round lands safely on the paper target.
- ARS Mark9.0
ARS Mark is a ranking system developed by bestairriflescopes.com. ARS Mark has no relationship or impact from any manufacturers or sales agent websites. Learn more
- BrandPIHSSFULL

- ARS Mark8.8
ARS Mark is a ranking system developed by bestairriflescopes.com. ARS Mark has no relationship or impact from any manufacturers or sales agent websites. Learn more
- BrandDINGCHUANG

- ARS Mark8.8
ARS Mark is a ranking system developed by bestairriflescopes.com. ARS Mark has no relationship or impact from any manufacturers or sales agent websites. Learn more
- BrandAISUNOUTDOOR

- ARS Mark8.8
ARS Mark is a ranking system developed by bestairriflescopes.com. ARS Mark has no relationship or impact from any manufacturers or sales agent websites. Learn more
- BrandEZshoot

- ARS Mark8.8
ARS Mark is a ranking system developed by bestairriflescopes.com. ARS Mark has no relationship or impact from any manufacturers or sales agent websites. Learn more
- BrandZOEKIM

- ARS Mark8.8
ARS Mark is a ranking system developed by bestairriflescopes.com. ARS Mark has no relationship or impact from any manufacturers or sales agent websites. Learn more
- BrandTroy Industries

- ARS Mark7.8
ARS Mark is a ranking system developed by bestairriflescopes.com. ARS Mark has no relationship or impact from any manufacturers or sales agent websites. Learn more
- BrandBooge

- ARS Mark7.2
ARS Mark is a ranking system developed by bestairriflescopes.com. ARS Mark has no relationship or impact from any manufacturers or sales agent websites. Learn more
- BrandAISUNOUTDOOR
Last update on 2026-09-30 / Affiliate links / Images, Product Titles, and Product Highlights from Amazon Product Advertising API
FAQs
Why does the front sight move opposite to the rear sight?
The front sight acts as the front pivot point of your visual line to the target. Lowering the front post forces you to tilt the entire barrel upward to bring the post back into your line of sight. Because the barrel now angles higher, your bullet strikes higher on the target face.
What does one click actually do to your shot?
One click moves the internal reticle or mechanical sight notch by a specific angle, usually measured in minutes of angle. That tiny angular change shifts the bullet impact by a set fraction of an inch on the target. The exact physical distance the hole moves depends on how far downrange your target is placed.
What is the difference between point of aim and point of impact?
Point of aim is the exact visual spot on the target where you place your red dot reticle or iron sight post. Point of impact is the actual physical hole where the bullet pierces the paper. Zeroing a firearm simply means adjusting your sights until your point of impact matches your point of aim.
Can a loose optic mount make it look like the sights are broken?
Yes, a loose mount or loose base screw causes the entire optic to shift under recoil after every round. This movement creates wandering bullet groups that never settle in one spot, tricking you into thinking your dials are not responding. Always check that your base and ring screws are tightened to spec before adjusting your dials.


12 Best 22 Pcp Air Rifle For Hunting of 2026 With Quiet Power

7 Best 22 Pcp Air Rifle Under 300 of 2026 For Backyard Pest Control

10 Best 22 Break Barrel Air Rifles of 2026 For Backyard Pest Control

10 Best 30 Caliber Pcp Air Rifle of 2026 For Medium Game

Top Best 177 Air Rifle Under 100: Budget-Friendly Picks for 2026

How to Safely Reload Shotgun Shells at Home

11 Best Co2 Air Rifle For Pest Control of 2026 To Ensure Humane Dispatch

12 Best Inexpensive Air Rifles of 2026 For Dependable Backyard Accuracy






